Close

Account

Documentation

Forum

Menu

Next
Prev

Post Paywall

Table of Contents


  1. Introduction
  2. Installation & Requirements
  3. Post Paywall Settings
  4. WooCommerce Settings
  5. Post Paywall Status
  6. Stripe Manage Cards
  7. Error Payment Method

1. Introduction


Post Paywall is a premium feature from JNews used for creating subscription or payment based content for your website. Your reader needs to buy a subscription or unlock package in order to read your post content.
Integrated with the popular plugin WooCommerce, will give you an easy way to setup products, managing orders, and payment.


2. Installation & Requirements


To enable Post Paywall on your website, you need to have the following plugins installed and active :

2.1. JNews Paywall, you can easily install and activate this plugin from JNews Dashboard → Install Plugin.

2.3. WPBakery or Elementor, you need this plugin to be able to add the Post Paywall element to your page. Choose one that is used on your website.

2.3. WooCommerce, you need to install this plugin in order to create a subscription or unlock product for Post Paywall. You can install this plugin through your WordPress Dashboard or JNews Plugin Dashboard.


3. Post Paywall Settings


3.1. Restricting Post Content Globally.
This will truncate all your post content for non-premium users.

You can access this option in Dashboard → JNews Paywall → Customizer Setting
or you can access directly from Customizer → JNews : Paywall Option → General Setting

Note : This option will override the option in point no 3.2.


3.2. Restricting Post Content only for some Posts.
This option will only truncate the post you choose.

You can access this option when you are editing the post, you will find the JNews : Paywall Single Post meta box right under the post editor.

Note : You need to disable the option in point no 3.1 to use this option, otherwise this option will be overridden.

3.3. Allow Post Content only for some Posts.
This option will allow some posts to be unlocked.

You can access this option when you are editing the post, you will find the JNews : Paywall Single Post meta box right under the post editor.

Note : You need to make sure the Block All Posts option is enabled to use this option

3.4. Customizing locked content preview.

Paywall provides an option to customize locked content preview instead of using the truncated paragraph.

You can access this option when you are editing the post, you will find the JNews : Paywall Single Post meta box right under the post editor.

3.5. Set Article Button.
This option will set the buttons in your truncated articles. It will redirect your user to the destination page you choose.

You can access this option in Dashboard → JNews Paywall → Customizer Setting
or you can access directly from Customizer → JNews : Paywall Option → General Setting

Preview :


4. WooCommerce Settings


You need to setup your the WooComerce Setting at first, after that, you can do the following settings :

4.1. Payment Settings 
This setting is required if you use the JNews product type, so your user can pay using Paypal and/or Credit Card via Stripe and create a billing agreement.

Paypal
You need to create a Paypal app & credentials here.

After you create Paypal app & credentials, please go to Paypal Subscription payment settings in WooCommerce → Settings → Payments → Paypal Subscription

Remember

You need a PayPal Business account to use PayPal Subscriptions. Also, you need to setup PayPal IPN, you can setup Paypal IPN on Paypal DashboardAccount SettingsNotificationInstant Payment Notifications or you can click here.

You must add the following webhook endpoint https://example.com/?wc-api=WC_Gateway_Paypal to your Notification URL. Change example.com with your domain

  1. Sandbox Mode
    Turn on this option if you using Sandbox APP credentials.
  2. PayPal APP Client ID
    Insert your PayPal app Client ID.
  3. PayPal APP Client Secret
    Insert Your PayPal app Client Secret.
  4. Receiver email
    Insert your main receiver email for your PayPal account here. This is used to validate IPN requests.
  5. Payment Timezone
    Choose your PayPal account Time zone. You can check it on ( PayPal > Account Settings > Account preferences > Time zone) or you can click here

Stripe

You need to create Stripe account & credentials here .

Remember

You must add the following webhook endpoint https://example.com/?jeg-paywall=stripe_webhook to your Stripe account settings. Change example.com with your domain

Please go to Stripe payment settings in WooCommerce → Settings → Payments → Stripe to add your credentials

  1. Enable Test Mode
    Turn on this option if you using Test Mode.
  2. Test Publishable Key
    Insert your Test Publishable Key if you use Test Mode.
  3. Test Secret Key
    Insert your Test Secret Key if you use Test Mode.
  4. Live Publishable Key
    Insert your Live Publishable Key if you use Live Mode.
  5. Live Secret Key
    Insert your Live Secret Key if you use Live Mode.
  6. Webhook Key
    Insert your Webhook Secret Key. Add the webhook endpoint to your Stripe account settings. Make sure you input customer.subscription.created, customer.subscription.deleted, and customer.subscription.updated, payment_intent.payment_failed, payment_intent.succeeded, charge.refunded events. Then put the Signing secret to Webhook Key option.
  7. Statement Descriptor
    Insert your Statement Descriptor.

After you set the credentials, you can activate Stripe.

Remember

Stripe requires a minimum of $0.5 and a maximum of $999,999.99 for each transaction. You can’t charge your customer if the amount of transactions are out of range.


4.2. Creating Products
To create Post Paywall products is the same way as you create other WooComerce products.

You need to go to DashboardProductAdd New
Then in the Product Data, you can choose these product types  :

4.2.1. JNews Post Subscribe product :

Remember

Make sure you have added and adjusted the payment method according to point 4.1 before creating the Jnews Post Subscribe product. If you make any adjustments to your payment method, you must recreate the Jnews Post Subscribe product because the Jnews Post Subscribe product is associated with your payment configuration.

  • You need to set the product Regular Price and Billing Time

4.2.2. JNews Post Unlock product :

  • You need to set the product Regular Price and Number of Post Unlock

4.2.3. Simple Subscription ( WooCommerce Subscriptions ) product :

  • You need to check JNews Post Subscribe option then set the product Subscription Price and Billing Time

4.3. Showing the Products
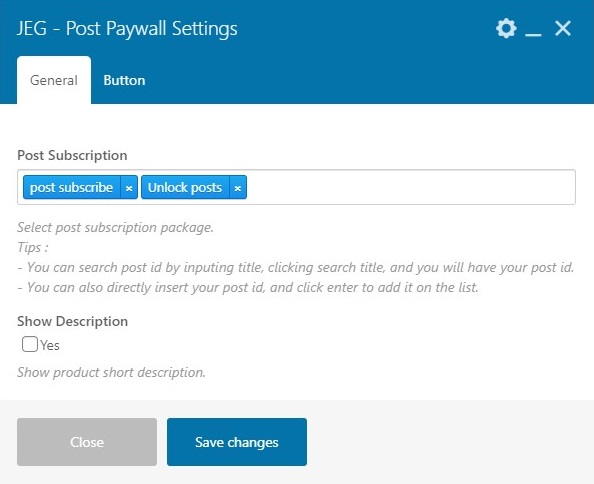
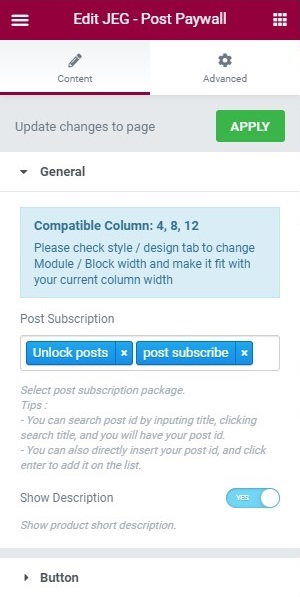
After you create products, you can add it to a page so your user can access it.

To do this, go to a page you want to add Post Paywall products.
Then edit the page using page builder WPBakery or Elementor, and add the element called JNews – Post Paywall.
Select the products you want to show on the page.

Example (in WPBakery) : 

After that, you can set the page as a destination target as mentioned in point 3.3.


5. Post Paywall Status


5.1. (ADMIN) All Users Status
This is the page where the administrator of the website could look at the status of their user.
No one can access this page except the administrator.
You could access this page in Dashboard → JNews Paywall → Users Status

5.2. (USER) Premium Status
This is the page for your user to see their premium status, either subscription status or unlocks status.
Your user can access this page from the backend or frontend.
In the frontend, they can access through My Account page
In the backend, they can access DashboardPremium Status


6. Stripe Manage Cards


When using Stripe, your user will be able to save their card to use it in the next purchase. Your user can access Woocommerce AccountPaywall Payment Methods to manage their cards.


7. Error Payment Method


If you have configured the payment methods (Stripe & Paypal Subscribe) correctly but there are no payment methods available on the checkout page, this may occur because you are using the new WooCommerce checkout page that auto generates when you are fresh install the WooComwerce with the new version.

The new WooComerce Chekout Page

Currently, additional JNews payment methods are not integrated with the new WooCommerce checkout page. To resolve this issue, you can use the old WooCommerce checkout page by following these steps:

1. Download the file from the following link.

2. Go to the Dashboard → Tools →  Import →  WordPress →  Run Import menu, then import the previously downloaded file.

import file

3. After the import process is complete, there will be a new page named Checkout Old on your website.

4. Go to the Dashboard   →  WooCommerce   →  Settings   →  Advanced   →  Page Setup menu, then change the  Checkout page option by selecting the newly imported Checkout Old page.


change the chekout page setup on woocomerce