Please note that there are various factors that may affect your site performance (not in theme support scope to handle), those may include:
- The elements arrangement & custom element Medium
- Images size & resolution Medium
- Third parties elements, plugins, & scripts High
- Server response time High
- Let’s Prepare
- Setup JNews Core Web Vital
- Setup JNews Page Speed
- Setup Google Analytics
- Enable Compression
- Optimize Images
- Leverage Browser Caching
- Use a Content Delivery Network ( CDN )
1. Let’s Prepare
- Please make sure you have already using the latest version of JNews theme V9 or higher and keep all JNews plugins up to date.
- We recommend you only activate the plugin that you really need. Less number of plugins will decrease the resource that needs to load and decrease the functionality that needs to be executed. This thing will improve your site performance.
- We suggest you do page speed optimization after you finish setting up your website. So you won’t need to refresh the cache every time you made any change on your site
2. Setup JNews Core Web Vital
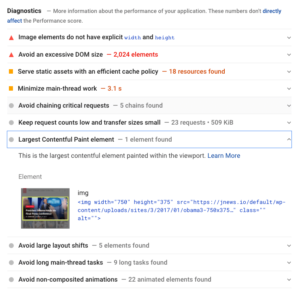
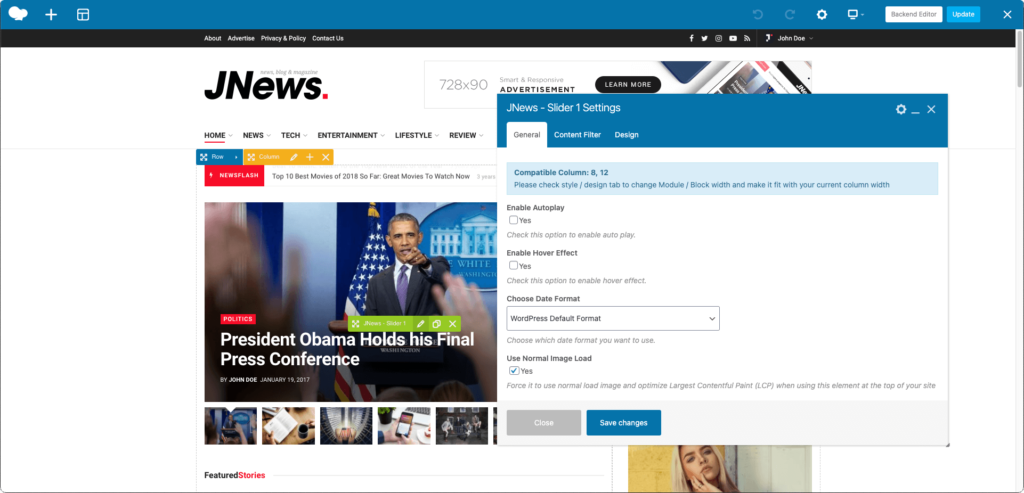
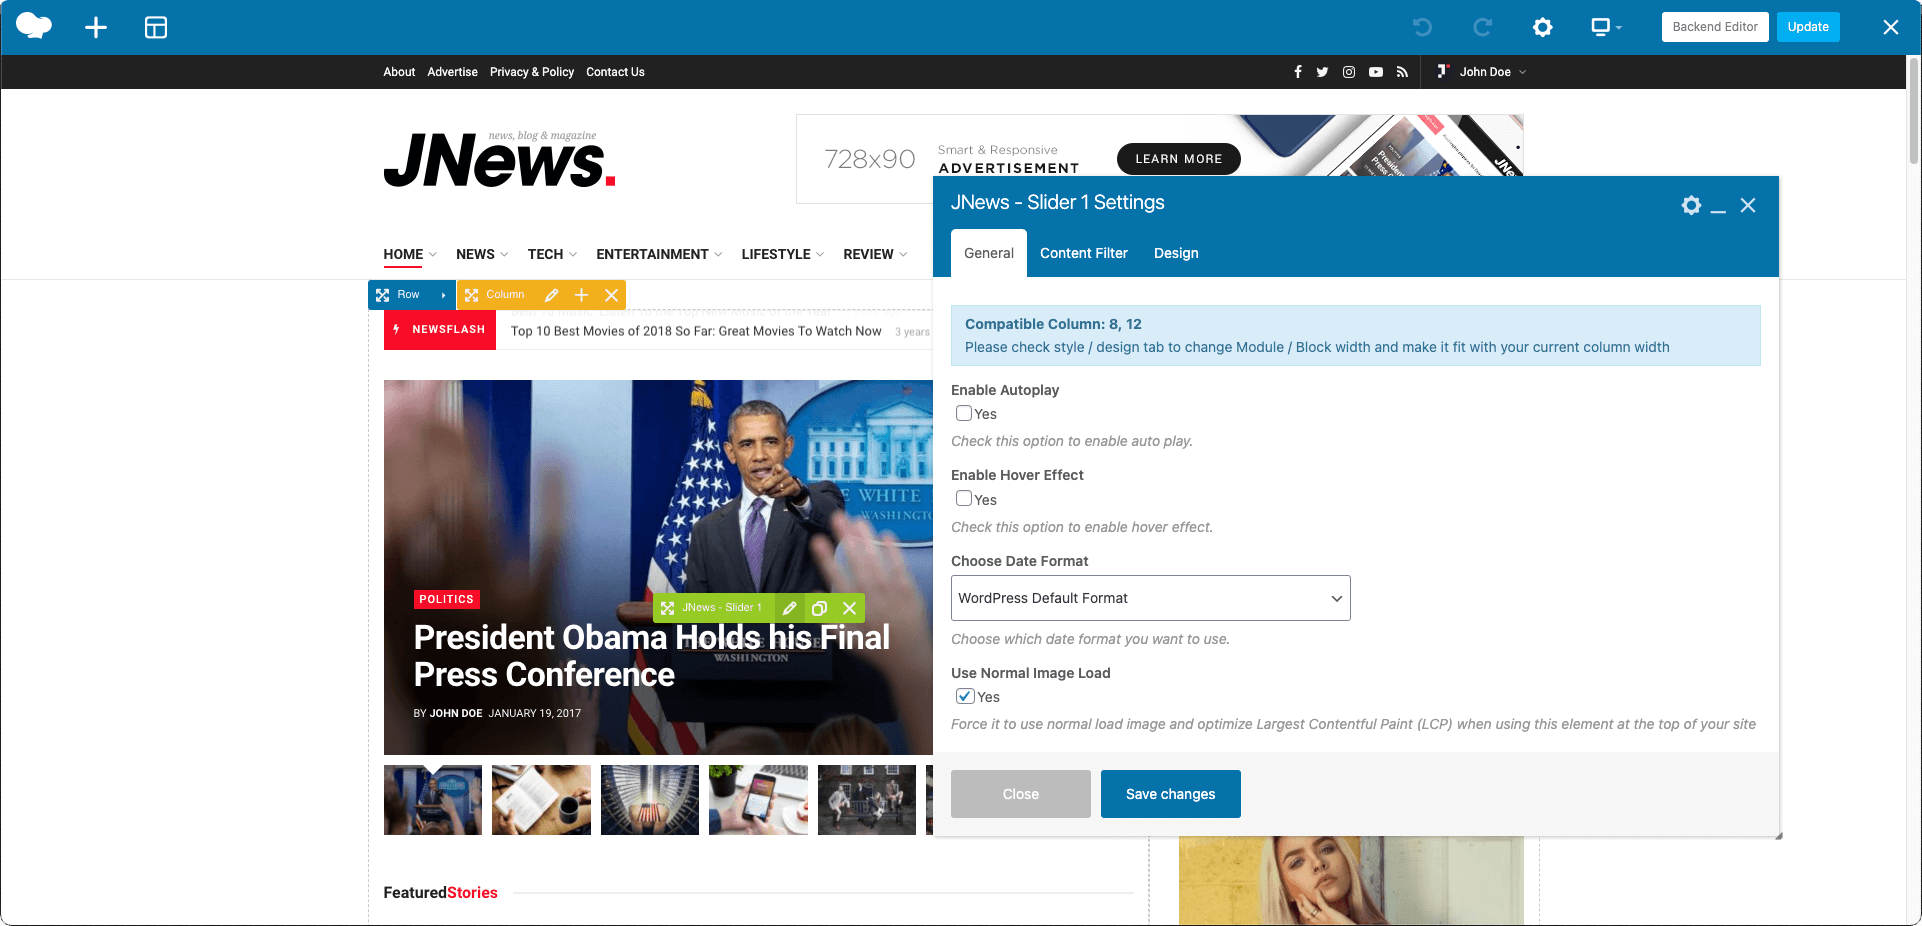
The Largest Contentful Paint ( LCP ) is responsible for the majority of the issues in JNews for Core Web Vital. To optimize the LCP, we’ve added a new option to the JNews element that allows you to do so.
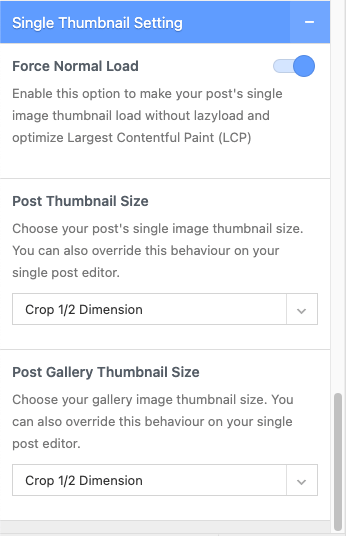
- Optimizing Largest Contentful Paint on a single post.
Please go to Customizer → JNews: Single Post Option → Single Post Option → Single Thumbnail Setting → Force Normal Load. This optimization may have no effect on custom featured images.

- Optimizing Largest Contentful Paint on a single page or landing page ( Only for JNews elements ).
It will take some effort to complete at this point. Please check your site on PageSpeed Insights and look for the Diagnostics → Largest Contentful Paint element to see which elements are causing Largest Contentful Paint. Now that you’ve identified the elements, use the page builder to edit your page and navigate to the element settings, where you can check the Use Normal Image Load option if it exists.

3. Setup JNews Page Speed
To begin, please install and activate Autoptimize and WP Super Cache plugins. To avoid conflicts, make sure there are no minify or other caches plugins installed. On JNews V6.5 we provide some speed options on the Customizer and we have improved the options on V9. Many PageSpeed Insight points, such as Speed Index and Total Blocking Time, can be optimized here.
You can use another Minify or caches plugin but you still need the Autoptimize plugin to use the Optimized Script Loader feature and make some adjustments.
- Disable all options related to JavaScript Optimization on other minify and caches plugins and Make sure other minify and cache plugins are not optimizing JavaScript
- Follow the following step below except :
- Autoptimize CSS option section
- Autoptimize HTML option section
- WP Super Cache Section
-
- Optimizing Total Blocking Time
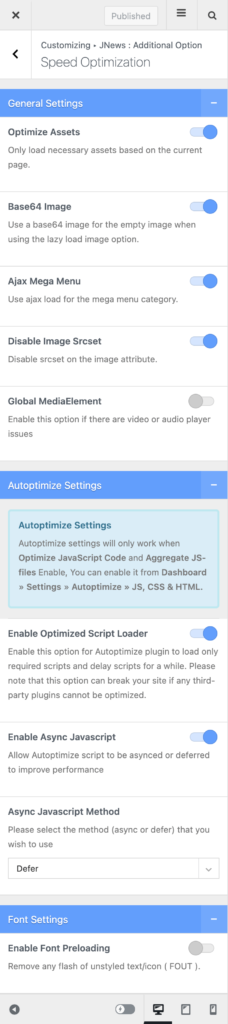
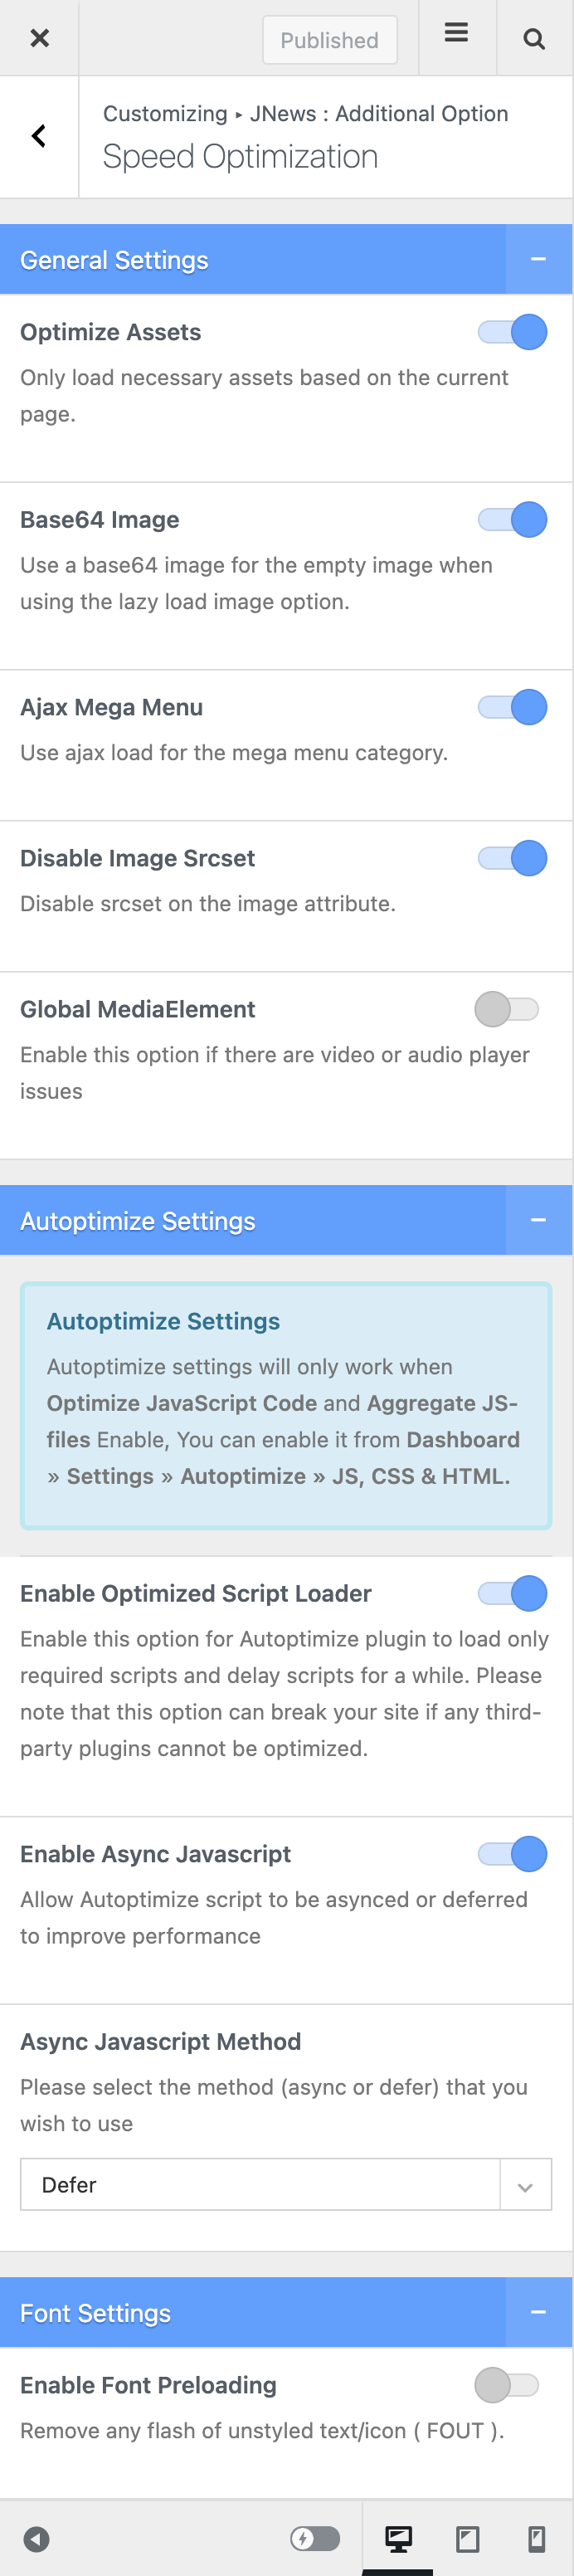
Please go to WordPress Admin Dashboard → Appearance → Customizer → JNews Additional Option → Speed Optimization.- Turn Optimize Assets option on.
- Turn Base64 Image option on.
- Turn Ajax Mega Menu option on.
- Turn Disable Image Srcset option on.
- Turn Enable Optimized Script Loader option on. ( Lazyload Script )
- Turn Enable Async Javascript option on.
- Select defer on Async Javascript Method
- Set the other options to off.
- Optimizing Speed Index
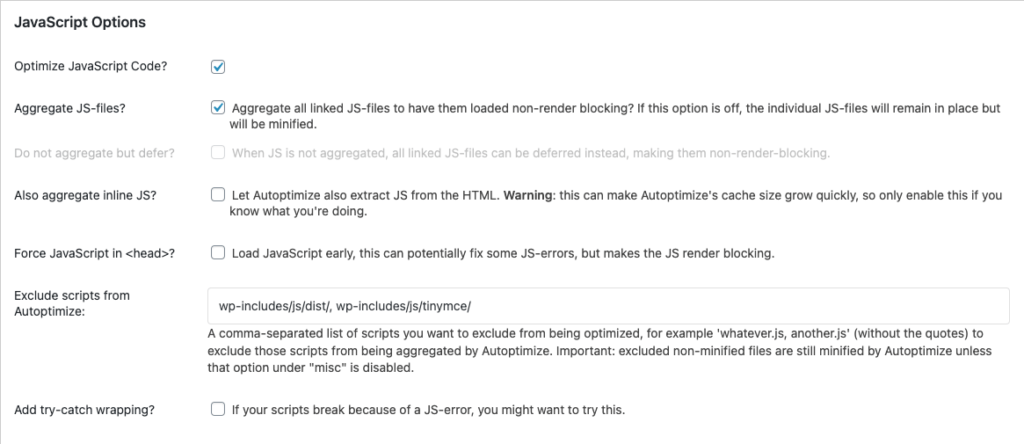
Please go to WordPress Admin Dashboard → Settings → Autoptimize → JS, CSS & HTML.
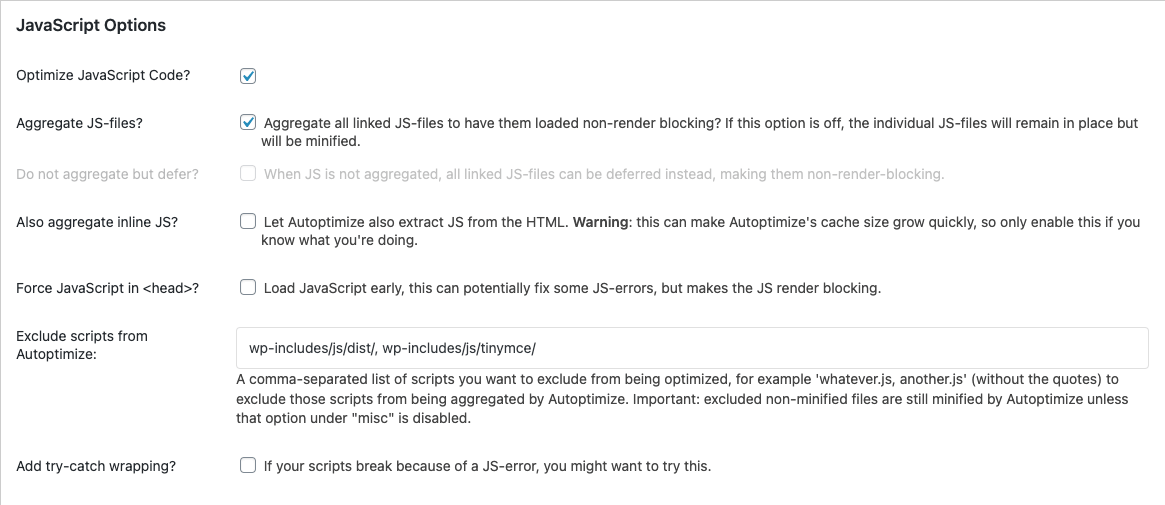
On JavaScript option section:- Turn Optimize JavaScript Code? option on.
- Turn Aggregate JS-files? option on.
- Please enter “
wp-includes/js/dist/, wp-includes/js/tinymce/” in Exclude scripts from Autoptimize Remember to make a backup before making changes, as this option can cause errors if third-party plugins or scripts and configurations are incorrect.* Note: If you encounter JS issue that related to undefined jQuery error, please try to insert “wp-includes/js/dist/, wp-includes/js/tinymce/, js/jquery/jquery.js, js/jquery/jquery.min.js“ - Other options should be left as default
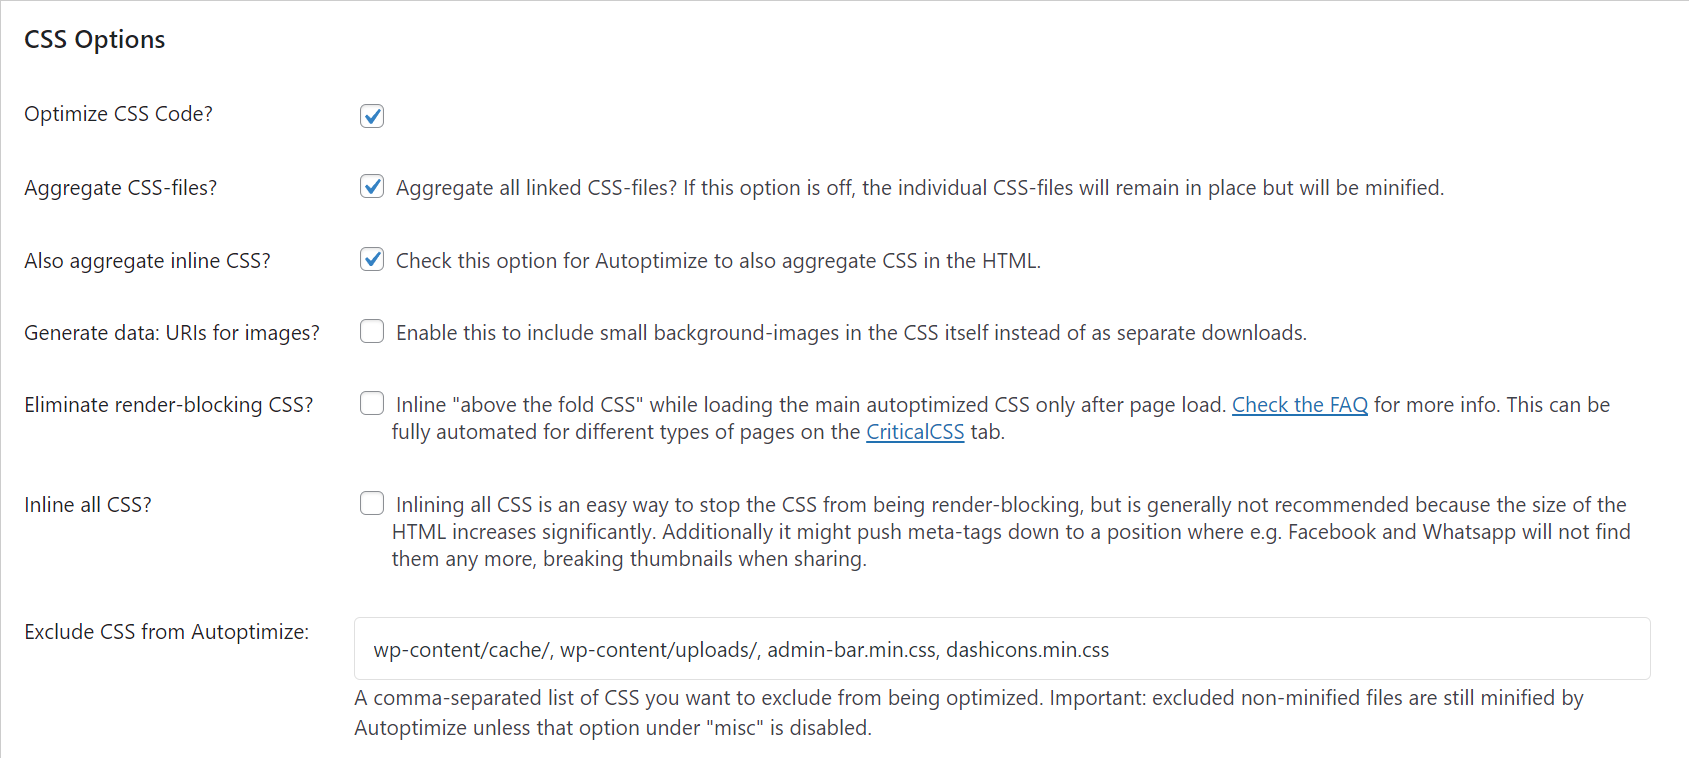
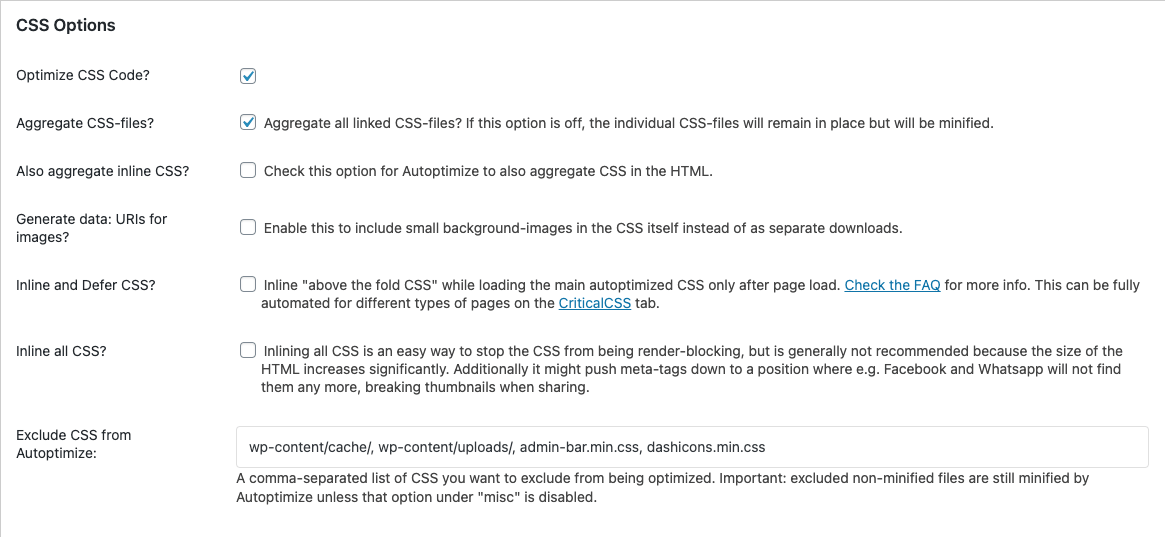
On CSS option section:- Turn Optimize CSS Code? option on.
- Turn Aggregate CSS-files? option on.
- Turn Also aggregate inline CSS-files? option on (you can turn off this option if the design of the website changes after you activate it).
- Other options should be left as default
On HTML option section:- Turn Optimize HTML Code? option on.
- Other options should be left as default

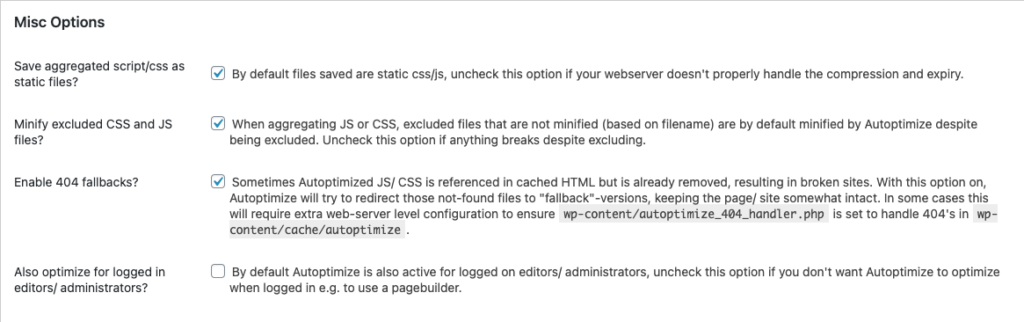
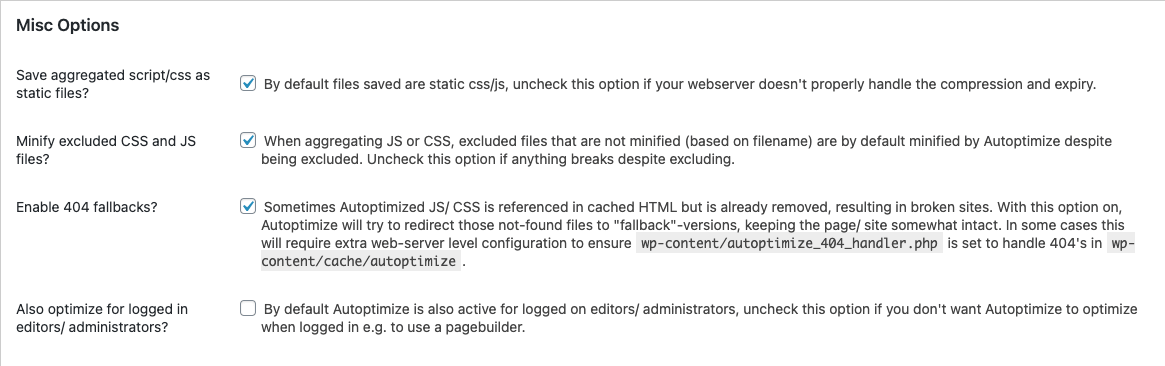
On Misc option section:- Turn Save aggregated script/css as static files? option on.
- Turn Minify excluded CSS and JS files? option on.
- Turn Enable 404 fallbacks? option on.
- Other options should be left as default
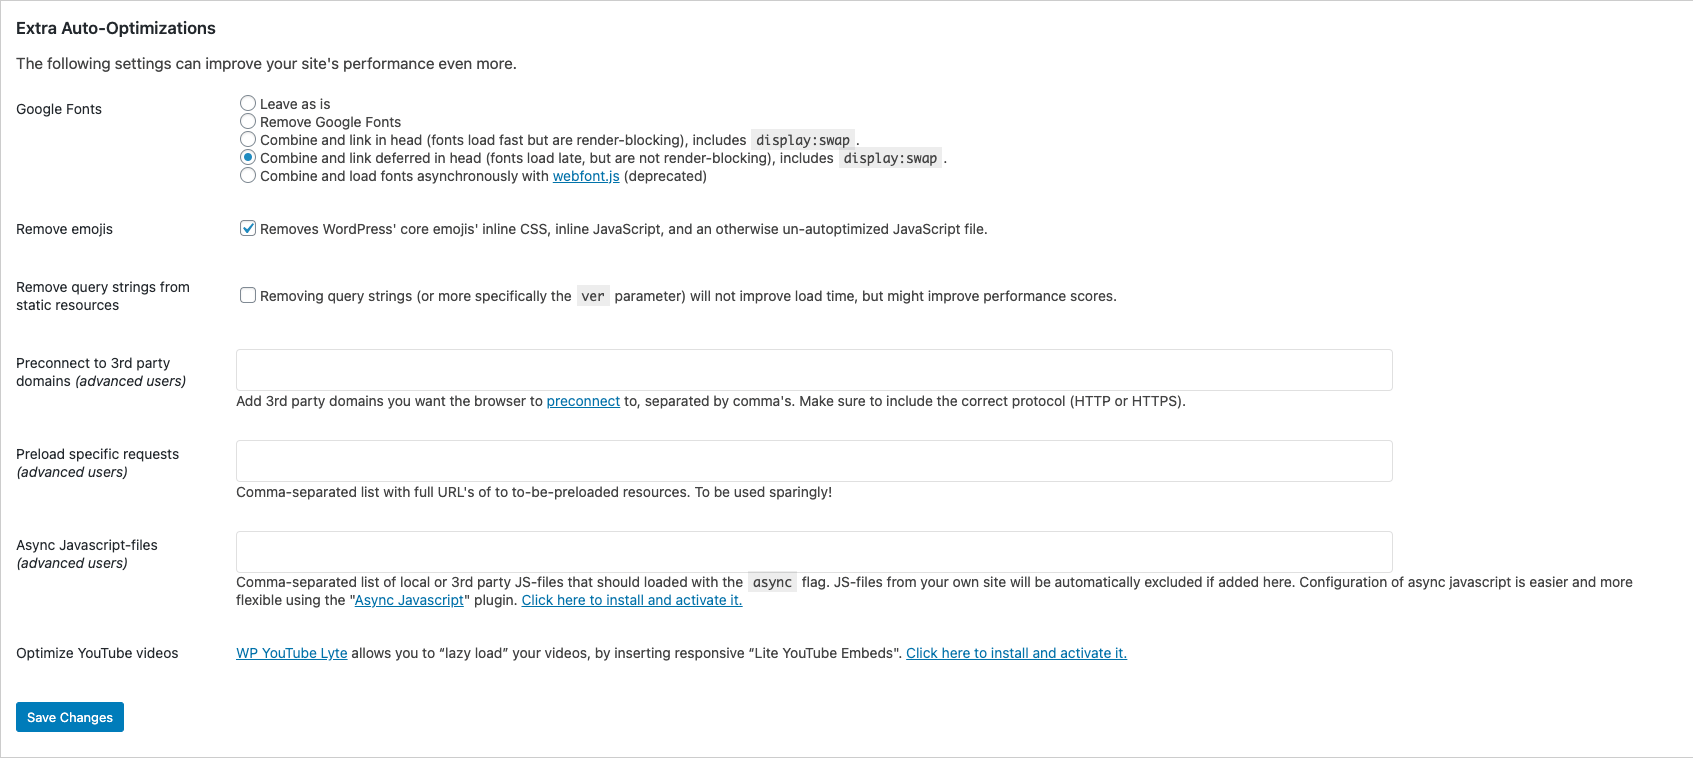
- Optimizing Third-Party Scripts
Please go to WordPress Admin Dashboard → Settings → Autoptimize → Extra.- Select Combine and link deferred in head on Google Fonts
- Turn Remove emojis option on.
- Set the other options to off.

- Optimizing Server Request
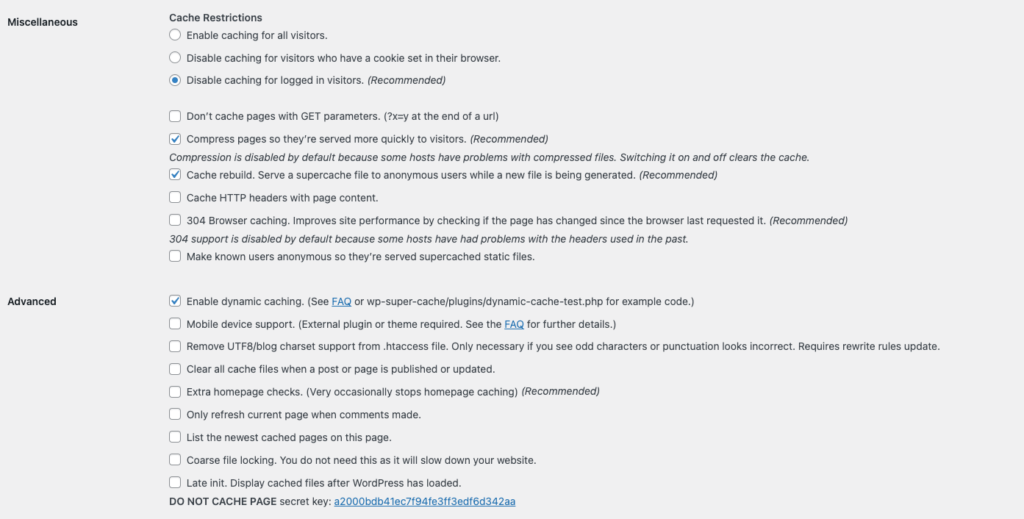
Please go to WordPress Admin Dashboard → Settings → WP Super Cache → Easy.- Turn Caching option on.

Then, please go to WordPress Admin Dashboard → Settings → WP Super Cache → Advanced.- Turn Compress pages option on.
- Turn Cache rebuild option on.
- Turn Enable dynamic caching option on.
- Optimizing Total Blocking Time


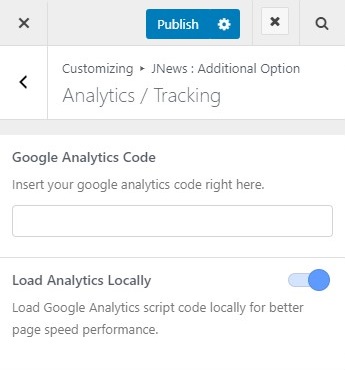
4. Setup Google Analytics
If you’re using Google Analytics on your website, we already provide an option to handle this thing. In this case, you don’t need to use an additional plugin to set up Google Analytics.
For setup, please go to WP Admin Dashboard → Appearance → Customizer → JNews Additional Option → Analytics / Tracking → then insert your Google Analytics code and enable Load Analytics Locally for better page speed result.
5. Enable Compression
Implementing the enable compression suggestion can be done simply in your server’s settings. If you are not very technical, you can ask your technical support team to enable GZIP compression for your server.
On the Apache server, you can add code below to tell your server to enable GZIP compression when returning a response to the browser.
<IfModule mod_deflate.c>
  # Compress HTML, CSS, JavaScript, Text, XML and fonts
  AddOutputFilterByType DEFLATE application/javascript
  AddOutputFilterByType DEFLATE application/rss+xml
  AddOutputFilterByType DEFLATE application/vnd.ms-fontobject
  AddOutputFilterByType DEFLATE application/x-font
  AddOutputFilterByType DEFLATE application/x-font-opentype
  AddOutputFilterByType DEFLATE application/x-font-otf
  AddOutputFilterByType DEFLATE application/x-font-truetype
  AddOutputFilterByType DEFLATE application/x-font-ttf
  AddOutputFilterByType DEFLATE application/x-javascript
  AddOutputFilterByType DEFLATE application/xhtml+xml
  AddOutputFilterByType DEFLATE application/xml
  AddOutputFilterByType DEFLATE font/opentype
  AddOutputFilterByType DEFLATE font/otf
  AddOutputFilterByType DEFLATE font/ttf
  AddOutputFilterByType DEFLATE image/svg+xml
  AddOutputFilterByType DEFLATE image/x-icon
  AddOutputFilterByType DEFLATE text/css
  AddOutputFilterByType DEFLATE text/html
  AddOutputFilterByType DEFLATE text/javascript
  AddOutputFilterByType DEFLATE text/plain
  AddOutputFilterByType DEFLATE text/xml

  # Remove browser bugs (only needed for really old browsers)
  BrowserMatch ^Mozilla/4 gzip-only-text/html
  BrowserMatch ^Mozilla/4\.0[678] no-gzip
  BrowserMatch \bMSIE !no-gzip !gzip-only-text/html
  Header append Vary User-Agent
</IfModule>
6. Optimize Images
Our themes try to optimize the image by making every image on the container as fit as possible.
But all images still need to be optimized. You can install a plugin such as wp-smushit to optimize the image.
or if you have access on your server, you can use this command (Imagick need to be installed) :
find /var/www/jnews.io/wp-content/uploads -name "*.jpg" -exec convert {} -sampling-factor 4:2:0 -strip -quality 85 -interlace JPEG -colorspace RGB {} \;
find /var/www/jnews.io/wp-content/uploads -name "*.png" -exec convert {} -strip {} \;
If you are not very technical, you can ask your technical support team to set up it on your server.
7. Leverage Browser Caching
When a web browser displays your webpage it has to load several things like your logo, your CSS files, JS files, and other resources.
What browser caching does is “remember” the resources that the browser has already loaded. When a visitor goes to another page on your website your logo, CSS files, etc. do not need to be loaded again, because the browser has them “remembered” (saved). This is the reason that the first view of a web page takes longer than repeat visits.
The code below tells browsers what to cache and how long to “remember” it. It should be added to the top of your .htaccess file
# 1 YEAR
ExpiresActive On
<FilesMatch "\.(otf|ico|pdf|flv|ttf|eot|svg|woff|mp3|ogg|mp4|webm|ogv)$">
  Header set Cache-Control "max-age=29030400, public"
  ExpiresDefault "access plus 1 years"
  Header unset Last-Modified
  Header unset ETag
  SetOutputFilter DEFLATE
</FilesMatch>

# 1 MONTHS
<FilesMatch "\.(jpg|jpeg|png|gif|swf)$">
  Header set Cache-Control "max-age=2419200, public"
  ExpiresDefault "access plus 1 month"
  SetOutputFilter DEFLATE
</FilesMatch>

<FilesMatch "\.(xml|txt|css|js)$">
  Header set Cache-Control "max-age=604800, public"
  ExpiresDefault "access plus 1 week"
  SetOutputFilter DEFLATE
</FilesMatch>

# 30 MIN
<FilesMatch "\.(html|htm|php)$">
  SetOutputFilter DEFLATE
</FilesMatch>
Again, if you are not very technical, you can ask your technical support team to set up it on your server.
8. Use a Content Delivery Network ( CDN )
Using a Content Delivery Network (CDN) can help to reduce load times for all of your visitors.
A CDN is a global network of servers. Each server will keep “static” files that make up your website. These static files include non-changing files such as images, CSS, and JavaScript. Unlike your WordPress pages, which are “dynamic”. When you use a CDN, users are served static files from the server that is closest to them each time they visit your website. Because the CDN is handling a lot of the work, your own web hosting server will be faster as well.
We recommend using the Cloudflare CDN. We have used the Cloudflare CDN on all of our websites. It works well with WordPress websites and complements your existing caching plugins for faster load times.