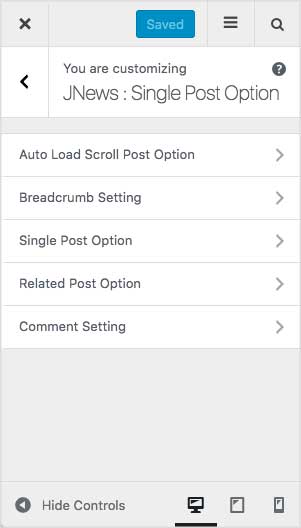
On JNews : Single Post Option, there are several section options that you will find :
- Auto Load Scroll Post Option
- Breadcrumb Setting
- Single Post Option
- Related Post Option
- Comment Setting
If you’re not familiar with JNews Customizer yet, you might need to check our Customizer Overview.
1. Auto Load Scroll Post Option
For more detail information about Auto Load Scroll Post Option, please visit our documentation about it on this page.
2. Breadcrumb Setting
For more detail information about Breadcrumb Setting, please visit our documentation about it on this page.
3. Single Post Option
In this part, you can setup general option for single post.
Also, you can override this option on single post editor. You can follow this link for more detail about override single post general option (jump into Single Post Setting part).
Single Blog Post Template
- Single Blog Post Template
Choose template for the single blog post. - Single Blog Post Layout
Choose layout for the single blog post. - Parallax Effect
Turn on this option to enable parallax effect on single blog post. Please note, this option will appear and work if you choose Template 4 or Template 5 on Single Blog Post Template option. - Fullscreen Featured Image
Turn on this option to enable parallax effect on single blog post. Please note, this option will appear and work if you choose Template 4 or Template 5 on Single Blog Post Template option. - Single Post Sidebar
Choose sidebar that you want to use on single blog post. Please note, this option will appear and work if you choose Right Sidebar or Left Sidebar on Single Blog Post Layout option.
Single Post Element
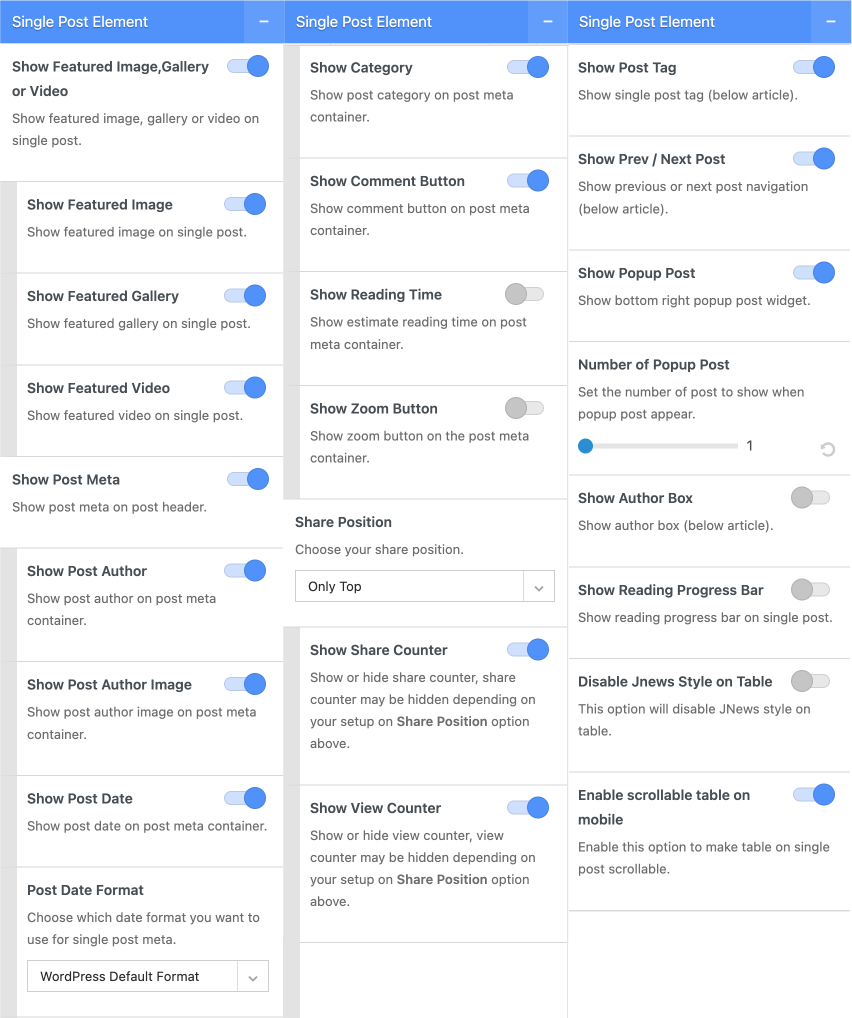
- Show Featured Image/Video
Turn on this option to show post featured image or video. - Show Post Meta
Turn on this option to show post meta. - Show Post Author
Turn on this option to show post author. Please note, this option will appear and work if Show Post Meta option enabled. - Show Post Author Image
Turn on this option to show post author image. Please note, this option will appear and work if both Show Post Meta option and Show Post Author option are enabled. - Show Post Date
Turn on this option to show post date. Please note, this option will appear and work if Show Post Meta option enabled. - Show Category
Turn on this option to show post category. Please note, this option will appear and work if Show Post Meta option enabled. - Show Comment Button
Turn on this option to show post comment button. Please note, this option will appear and work if Show Post Meta option enabled. - Show Reading Time
Turn on this option to show estimate reading time on post meta container. Please note, this option will appear and work if Show Post Meta option enabled.- Words Per Minute
Set the average reading speed for the user.
- Words Per Minute
-
- Word Count Calculation Method
Choose the Word Calculation Method for reading time calculation. By default, the PHP Word Counter Method is used, but certain languages like Ibrani cannot be counted using this method. Therefore, you can choose the Count the spaces between the words method if the reading time calculation in your article is incorrect.
- Word Count Calculation Method
- Share Position
Choose position of share button on single blog post. - Float Share Style
Choose style for floated share button. Please note, this option will appear and work if you choose Only Float or Float + Bottom on Share Position option. - Show Share Counter
Turn on this option to show share counter. Please note, this option will appear and work if you choose Only Top or Top + Bottom on Share Position option. - Show View Counter
Turn on this option to show view counter. Please note, this option will appear and work if you choose Only Top or Top + Bottom on Share Position option. - Show Post Tag
Turn on this option to show post tag. - Show Prev / Next Post
Turn on this option to show prev and next post. - Show Popup Post
Turn on this option to show popup post. - Number of Popup Post
Set the number of post to show when popup post appears. Please note, this option will appear and work if Show Popup Post option enabled. - Show Author Box
Turn on this option to show author box. - Disable Jnews Style on Table
This option will disable JNews style on table. - Enable scrollable table on mobile
Enable this option to make table on single post scrollable.
Single Thumbnail Setting
- Post Thumbnail Size
Choose your post single image thumbnail size. You can also override this behaviour on your Single Post editor. - Post Gallery Thumbnail Size
Choose your gallery image thumbnail size. You can also override this behaviour on your Single Post editor.
4. Related Post Option
In this part, you can setup related post option.
- Show Post Related
Turn on this option to show related post.
This option below will appear if Show Post Related option enabled.
- Related Post Filter
Choose how related post will filter your article. - Related Post Module Header Style
Choose header style for related post. - Related Pagination Style
Choose pagination style for related post. - Number of Post
Set the number of related post. - Auto Load Limit
Set the limit of auto load post. Please note, this option will appear and work if you don’t choose No Pagination on Related Pagination Style option. - Related Post Template
Choose template for related post. - Excerpt Length
Set word length of post excerpt on related post. - Related Post Date Format
Choose date format for related post. - Custom Date Format for Related Post
Set date format for related post. For more detail about date format, please refer to Developer Codec.
5. Comment Setting
In this part, you can setup general comment setting.
- Comment Type
Choose comment platform to use. - Disqus Shortname
Insert your Disqus shortname. You can register your website and get Disqus shortname for your website here. Please note, this option will appear and work if you choose Disqus Comment on Comment Type option on above. - Disqus API Key
Insert your Disqus API key. You can create an application and get Disqus API Key for your website here. Please note, this option will appear and work if you choose Disqus Comment on Comment Type option on above. - Facebook App ID
Insert your Facebook App id. You can create an application and get Facebook App id for your website here. Please note, this option will appear and work if you choose Facebook Comment on Comment Type option on above. - Comment Cache Lifetime
Set the lifetime of comment cache in hours. Please note, this option will appear and work if you’re not using WordPress Comment type.


