
JNews Optimizer
JNews Optimizer helps you scan published pages and posts, find performance and content-quality issues, apply supported fixes, and review the result from one dashboard.
The scanner checks the rendered version of your website on desktop and mobile. It can find image optimization opportunities, SEO issues, accessibility issues, and the editable source of an issue when that information is available.
JNews Optimizer is designed for websites using the JNews theme. A valid and active JNews license is required to unlock the Optimizer dashboard.
We recommend creating a backup and testing the recommended settings on a staging website before applying them to a live website. Clear your WordPress, server, and CDN caches after changing optimization settings.
Keep Autoptimize deactivated while JNews Optimizer is enabled. Go to Plugins → Installed Plugins, find Autoptimize, and click Deactivate before using JNews Optimizer. Clear your website, server, and CDN caches after deactivating it.
You can use WP Super Cache alongside JNews Optimizer to help improve server response time. WP Super Cache serves cached HTML pages to visitors, reducing the work WordPress needs to do for each cached request. Install and activate the plugin, enable page caching, and test your website while signed out. Clear the WP Super Cache cache after changing optimization settings or applying fixes, before re-analyzing your pages.
Requirements
- The JNews Twenty theme must be installed and activated.
- Your JNews Twenty license must be valid, active, and registered for the current domain.
- You must sign in with a WordPress account that can manage theme options.
- Your account must have permission to upload files before it can generate WebP images.
- The server image editor must support WebP to use WebP conversion.
- Scanner targets must be published WordPress pages or posts with URLs on the same domain as the WordPress dashboard.
Elementor, WP Bakery, and WooCommerce are optional. Their related settings are available only when the corresponding plugin and feature are detected.
Installing JNews Optimizer
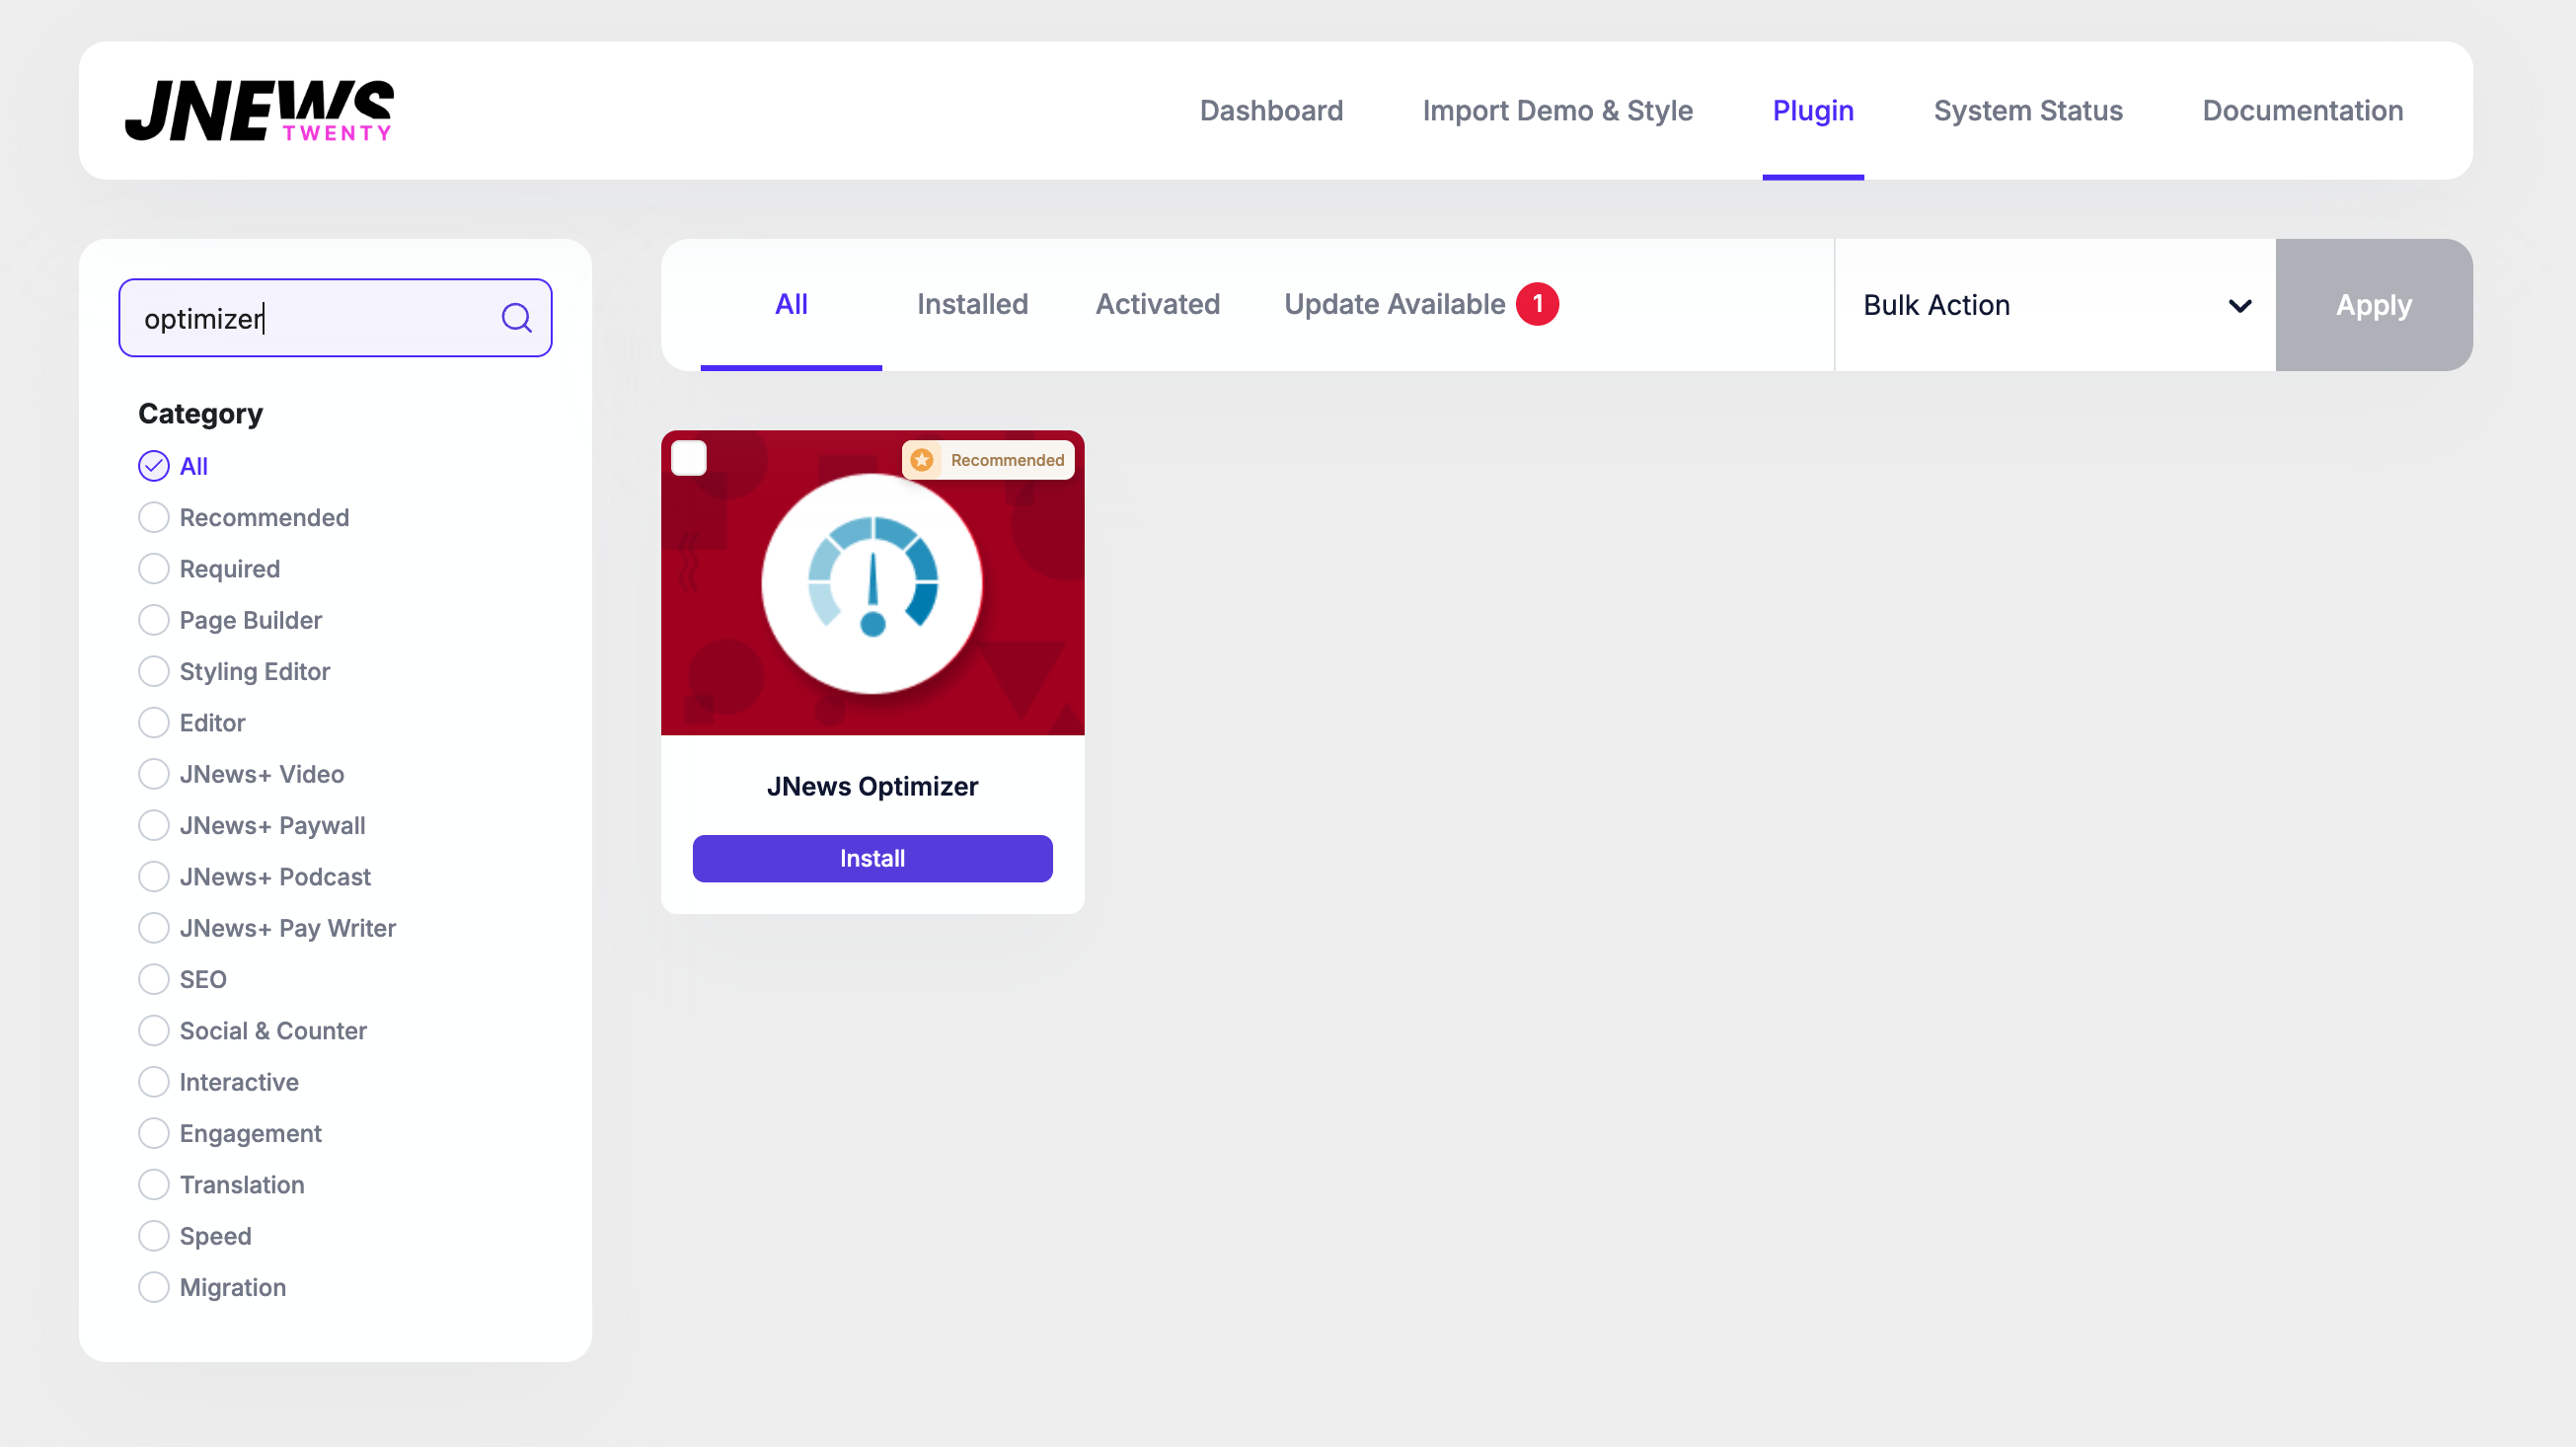
You can install JNews Optimizer from a plugin ZIP file.
- Sign in to your WordPress Dashboard.
- Go to JNews Dashboard → Plugins.
- then search JNews Optimizer.
- Click Install.
- After the installation is complete, click Activate.
- Make sure the JNews theme and your JNews license are active.
- Go to JNews → Optimizer.
The Optimizer dashboard contains three main tabs:
- Scanner
Choose the pages and posts you want to scan, run the analysis, and review the recommendation summary. - Settings
Configure image, JavaScript, CSS, font, WordPress, Elementor, WP Bakery, JNews, and WooCommerce optimization options. - Result
Review saved scan results for individual pages and posts, inspect issues, apply supported fixes, and re-analyze content.
If the Optimizer screen shows an activation, expired-license, or upgrade notice, verify the JNews license and registered domain first. The Scanner, Settings, and Result tabs become available only after the license check succeeds.
Using Recommended Settings
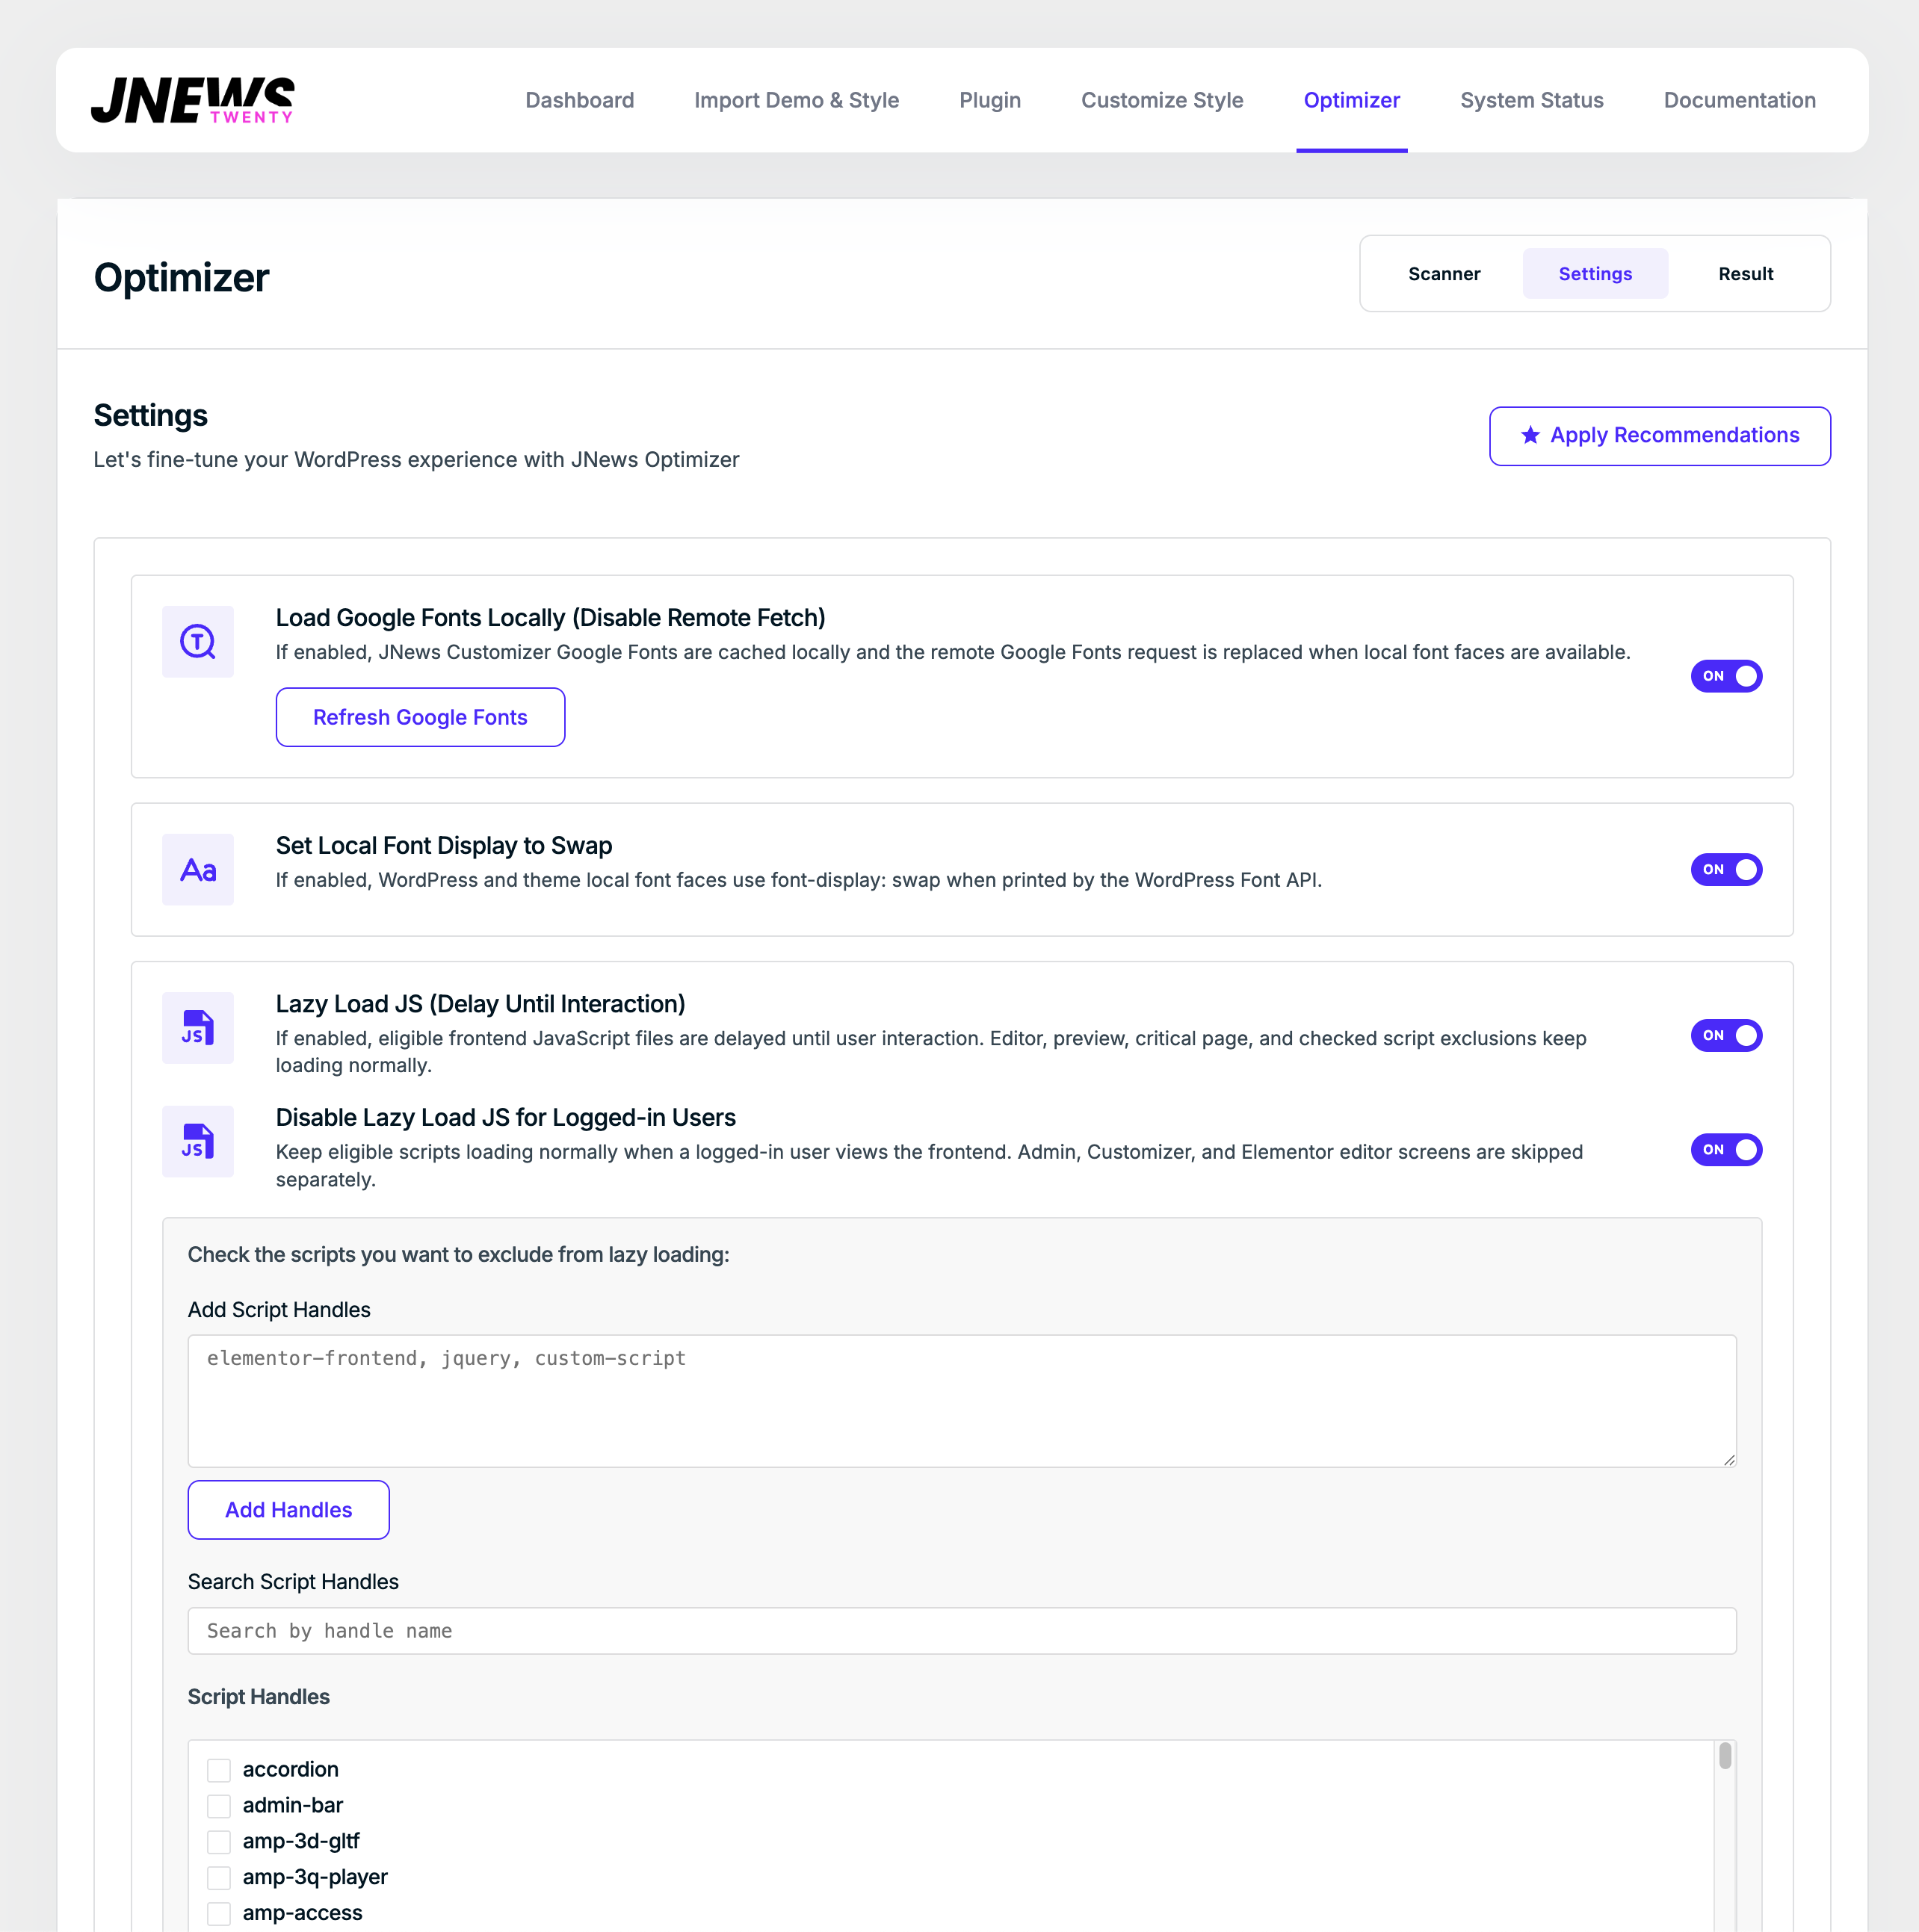
Go to JNews → Optimizer → Settings.
For a quick starting configuration:
- Click Apply Recommendations.
- Review the changed controls on the Settings screen.
- Click Save Settings at the bottom of the screen.
- Clear all website caches.
- Test important pages while signed out, including the homepage, article pages, menus, forms, sliders, videos, and WooCommerce pages when applicable.
The Apply Recommendations button updates the settings shown on the screen, but it does not save them. You must click Save Settings to make the changes persistent.
Recommended options selected from Scanner Step 3 are applied through the Scanner action instead.
The recommended preset uses the following configuration:
| Settings Group | Recommended Behavior |
|---|---|
| Fonts | Loads JNews Customizer Google Fonts locally when available and uses font-display: swap for supported local font faces. |
| JavaScript | Enables Lazy Load JS, keeps it disabled for logged-in users, preserves custom exclusions, and keeps important WordPress and Elementor handles excluded from the delay. |
| Excluded Paths | Excludes /wp-login.php, /wp-signup.php, and /wp-activate.php from Lazy Load JS while preserving custom excluded paths. |
| Images | Enables automatic WebP generation for new JPEG and PNG uploads when the server supports WebP. |
| WordPress | Reduces frontend wp-i18n locale data and prevents WordPress from automatically adding fetchpriority="high" so JNews can manage image priority consistently. |
| JNews | Enables page preloading, necessary asset loading, inline frontend assets, the empty base64 image placeholder, Ajax mega menus, and FontAwesome SVG conversion. |
| JNews Compatibility | Keeps header assets and responsive image srcset enabled, keeps global MediaElement disabled, and keeps icon-font preloading disabled when FontAwesome icons are converted to SVG. |
| Elementor | Uses the Internal CSS Print Method, inlines selected local frontend styles, disables legacy Font Awesome 4, and uses local Google Fonts when Elementor Google Fonts have not been manually disabled. |
| Elementor Compatibility | Keeps Elementor Optimized Image Loading and Lazy Load Background Images disabled to avoid conflicting image-priority and lazy-loading behavior. |
| WP Bakery | Uses local Google Fonts when WP Bakery Google Fonts have not been manually disabled and inlines supported WP Bakery frontend styles. |
| WooCommerce | Keeps WooCommerce CSS available on non-shop pages for compatibility and inlines supported local WooCommerce styles when WooCommerce is active. |
Settings Preserved as Manual Choices
The preset does not change these manual font-strategy controls:
- Disable Elementor Google Fonts
- Disable WP Bakery Google Fonts
- Disable WP Bakery Font Awesome
If Elementor or WP Bakery Google Fonts are manually disabled, the preset does not enable the corresponding local or inline local Google Font options. Settings that are not supported by the current environment are disabled or omitted.
Recommended Testing Order
- Apply and save the recommendations on a staging website.
- Clear every cache layer.
- Test the website while signed out, because Lazy Load JS is disabled for logged-in users by default.
- Test navigation, search, forms, popups, sliders, video/audio players, advertisement output, and page-builder widgets.
- Test cart, checkout, account, and payment pages when WooCommerce is active.
- If a feature stops working, disable the related setting, save again, clear caches, and retest.
Using the Scanner
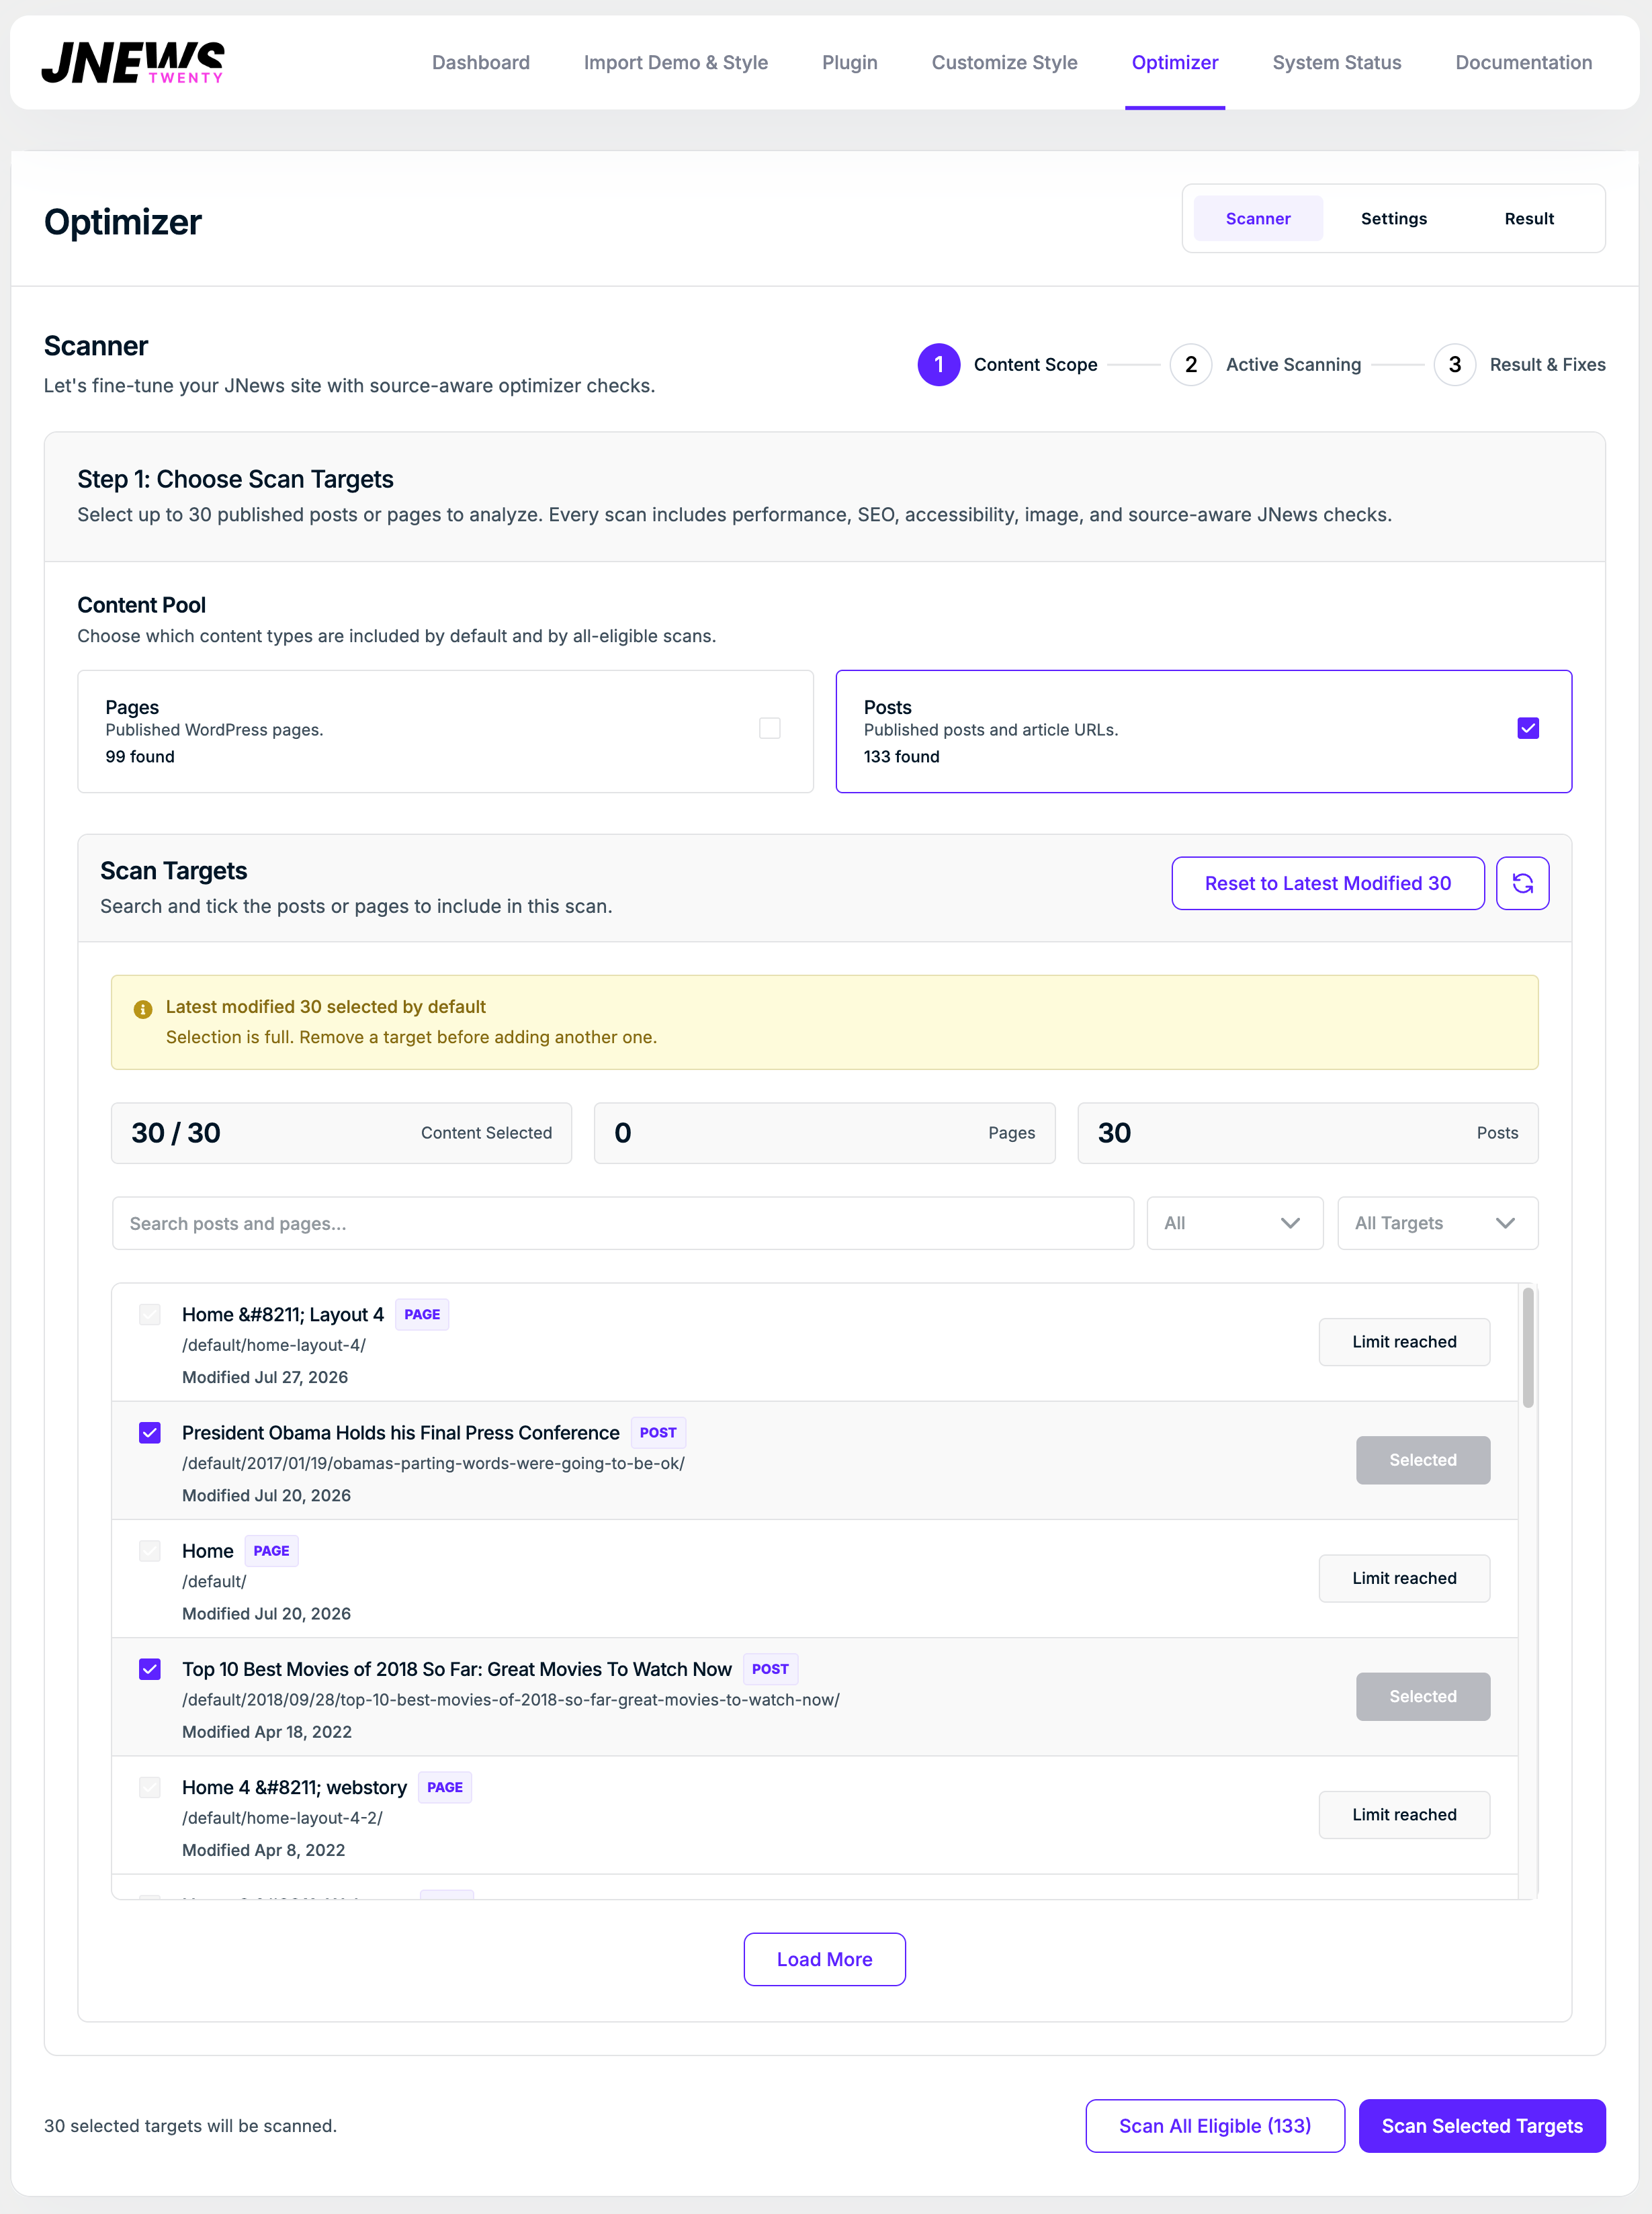
Go to JNews → Optimizer → Scanner. The Scanner uses a three-step workflow.
Step 1: Choose Scan Targets
The first step lets you choose which published content will be analyzed.
- Content Pool
Enable Pages, Posts, or both. These choices control the default selection and the content included by Scan All Eligible. - Latest Modified Selection
JNews Optimizer selects up to 30 of the latest modified eligible targets by default. - Scan Targets
Use the checkboxes to add or remove individual pages and posts. A selected-target scan can contain up to 30 targets. - Search
Use Search posts and pages… to find a target by title or URL. - Target Type Filter
Choose All, Pages, or Posts. - Target List Filter
Choose All Targets to browse available content or Selected Only to review the current selection. - Reset to Latest Modified 30
Restore the default selection. - Load More
Load another group of matching targets when more results are available.
When your selection is ready, choose one of these scan options:
- Scan Selected Targets
Scans only the targets currently selected in the picker. - Scan All Eligible
Scans all eligible published pages and posts from the enabled Content Pool. The number in the button shows how many targets will be included.
Every scan automatically includes performance, SEO, accessibility, image, and source-aware JNews checks. There are no separate checkboxes for individual tests.
JNews Builder targets, virtual archive URLs, WooCommerce product/archive targets, and product post types are not included in automatic scanning.
Step 2: Active Scanning
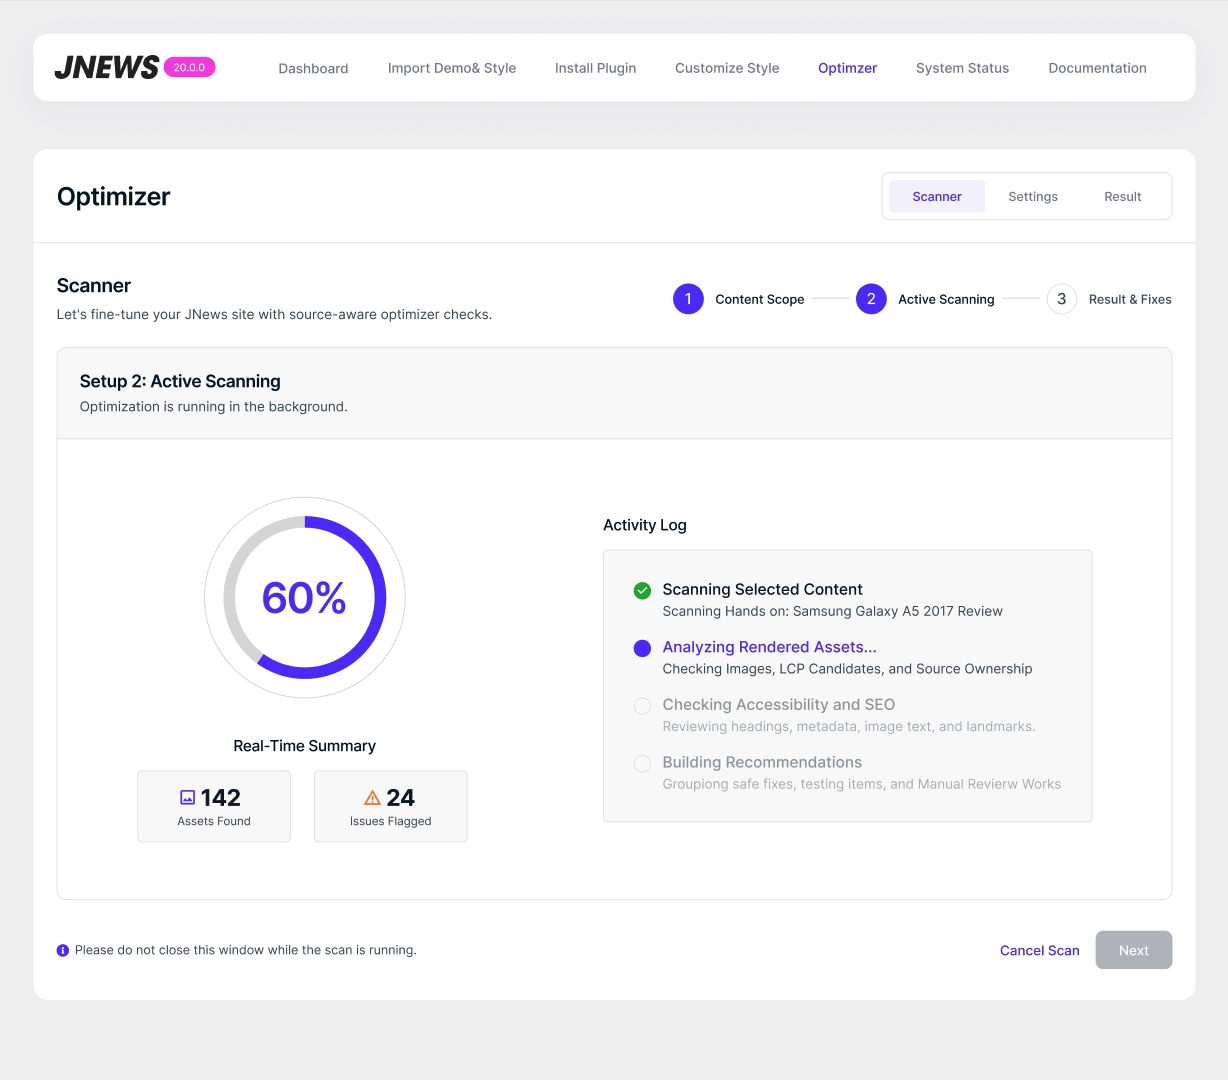
After you start a scan, JNews Optimizer processes the selected targets one at a time. It loads each public URL, checks the rendered page in desktop and mobile viewports, collects the issues, and saves the result.
The Activity Log shows these stages:
- Scanning selected content — prepares the selected URLs.
- Analyzing rendered assets — checks images, WebP candidates, and source ownership.
- Checking accessibility and SEO — reviews headings, metadata, image text, and landmarks.
- Building recommendations — separates automatic fixes, recommended options, and manual work.
Keep the Optimizer browser tab open while the scan is running. Clicking Cancel Scan stops the browser from claiming another target after the current target finishes.
Step 3: Result & Fixes
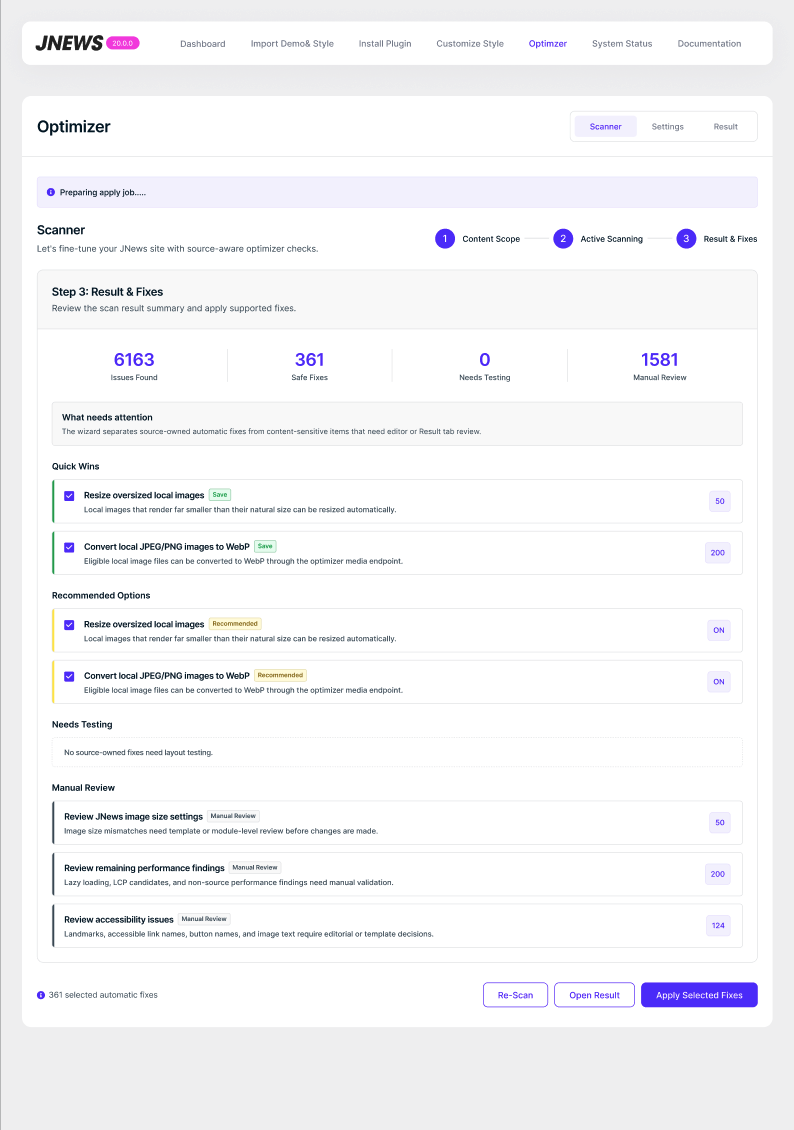
When the scan finishes, the Scanner displays two summaries.
- Fresh Scans — targets with a current completed scan.
- Needs Re-scan — targets changed after the saved scan or whose saved scan is no longer current.
- Failed — targets that could not be analyzed.
- Unscanned — selected targets without a saved result.
- Issues Found — the total number of detected issues.
- Safe Fixes — supported items JNews Optimizer can apply automatically.
- Recommended Options — suggested Optimizer settings that have not been applied.
- Manual Review — SEO or accessibility findings that require an editorial or template decision.
Recommendations are separated into the following groups:
- Quick Wins
Safe automatic actions, currently eligible local JPEG/PNG images that can receive a WebP derivative. - Recommended Options
Suggested settings for the detected environment. - Manual Review
Issues that JNews Optimizer reports but does not change automatically.
Select the automatic items you want to use, then click Apply Selected Items. You can also click Open Result to inspect individual pages and issues before applying anything.
JNews Optimizer does not automatically change SEO titles, meta descriptions, headings, image alternative text, accessibility landmarks, shortcode content, WP Bakery content, widgets, menus, theme PHP, custom HTML, JNews Builder output, or uncertain sources.
Issues Checked by the Scanner
The Scanner reports the following types of issues:
- Images
- Visible images without an explicit width or height.
- Visible images without alternative text.
- Eligible local JPEG or PNG images that can be converted to WebP.
- Image candidates from normal image URLs, lazy-image attributes, responsive
srcset, CSS backgrounds, video posters, featured images, supported WordPress blocks, JNews logos, and enabled JNews image advertisements.
- Accessibility
- A missing
mainelement orrole="main"landmark.
- A missing
- Headings
- A missing H1 heading.
- More than one H1 heading.
- Skipped heading levels, such as moving from H2 directly to H4.
- Content & Meta
- A missing document title.
- A title that is too long.
- A missing meta description.
Applying Fixes
Scan results never change your website by themselves. A change is made only after you click an apply button.
There are three ways to start a supported fix:
- From Scanner Step 3, select the desired Quick Wins and click Apply Selected Items.
- From the Result tab, click Apply Safe Fixes to process the available safe fixes in the current result set.
- Expand an image issue in the Result table and click Convert image to process that individual image.
Convert Local JPEG/PNG Images to WebP
The automatic image fix generates a WebP derivative for an eligible local JPEG or PNG file.
- The original JPEG or PNG file is not replaced.
- Existing post content is not rewritten.
- The WebP file is generated next to the local source image.
- JNews Optimizer records the generated WebP file and can serve it on supported frontend output.
- Registered Media Library image sizes can receive matching WebP files.
- A resized image URL may need its own matching WebP derivative before that exact URL can be replaced.
- Supported JNews logo and image advertisement files can use a generated WebP file even when they are not linked to a normal Media Library attachment.
The apply job processes items one at a time. Depending on the current job state, you can use Pause, Resume, Cancel, or Retry Failed.
An image can be skipped when:
- It is hosted on another domain.
- It is not a local JPEG or PNG file.
- It cannot be resolved to an eligible Media Library or local uploads file.
- A WebP derivative already exists.
- The active server image editor does not support WebP.
- The current WordPress account does not have the required media permission.
After a successful image fix, the affected Result row changes to Needs re-scan. This is expected. Click Re-analyze for that row, or run the target through the Scanner again, to confirm the rendered page now uses the optimized image.
Clear any page, server, and CDN caches before re-analyzing the target.
Understanding the Result Table
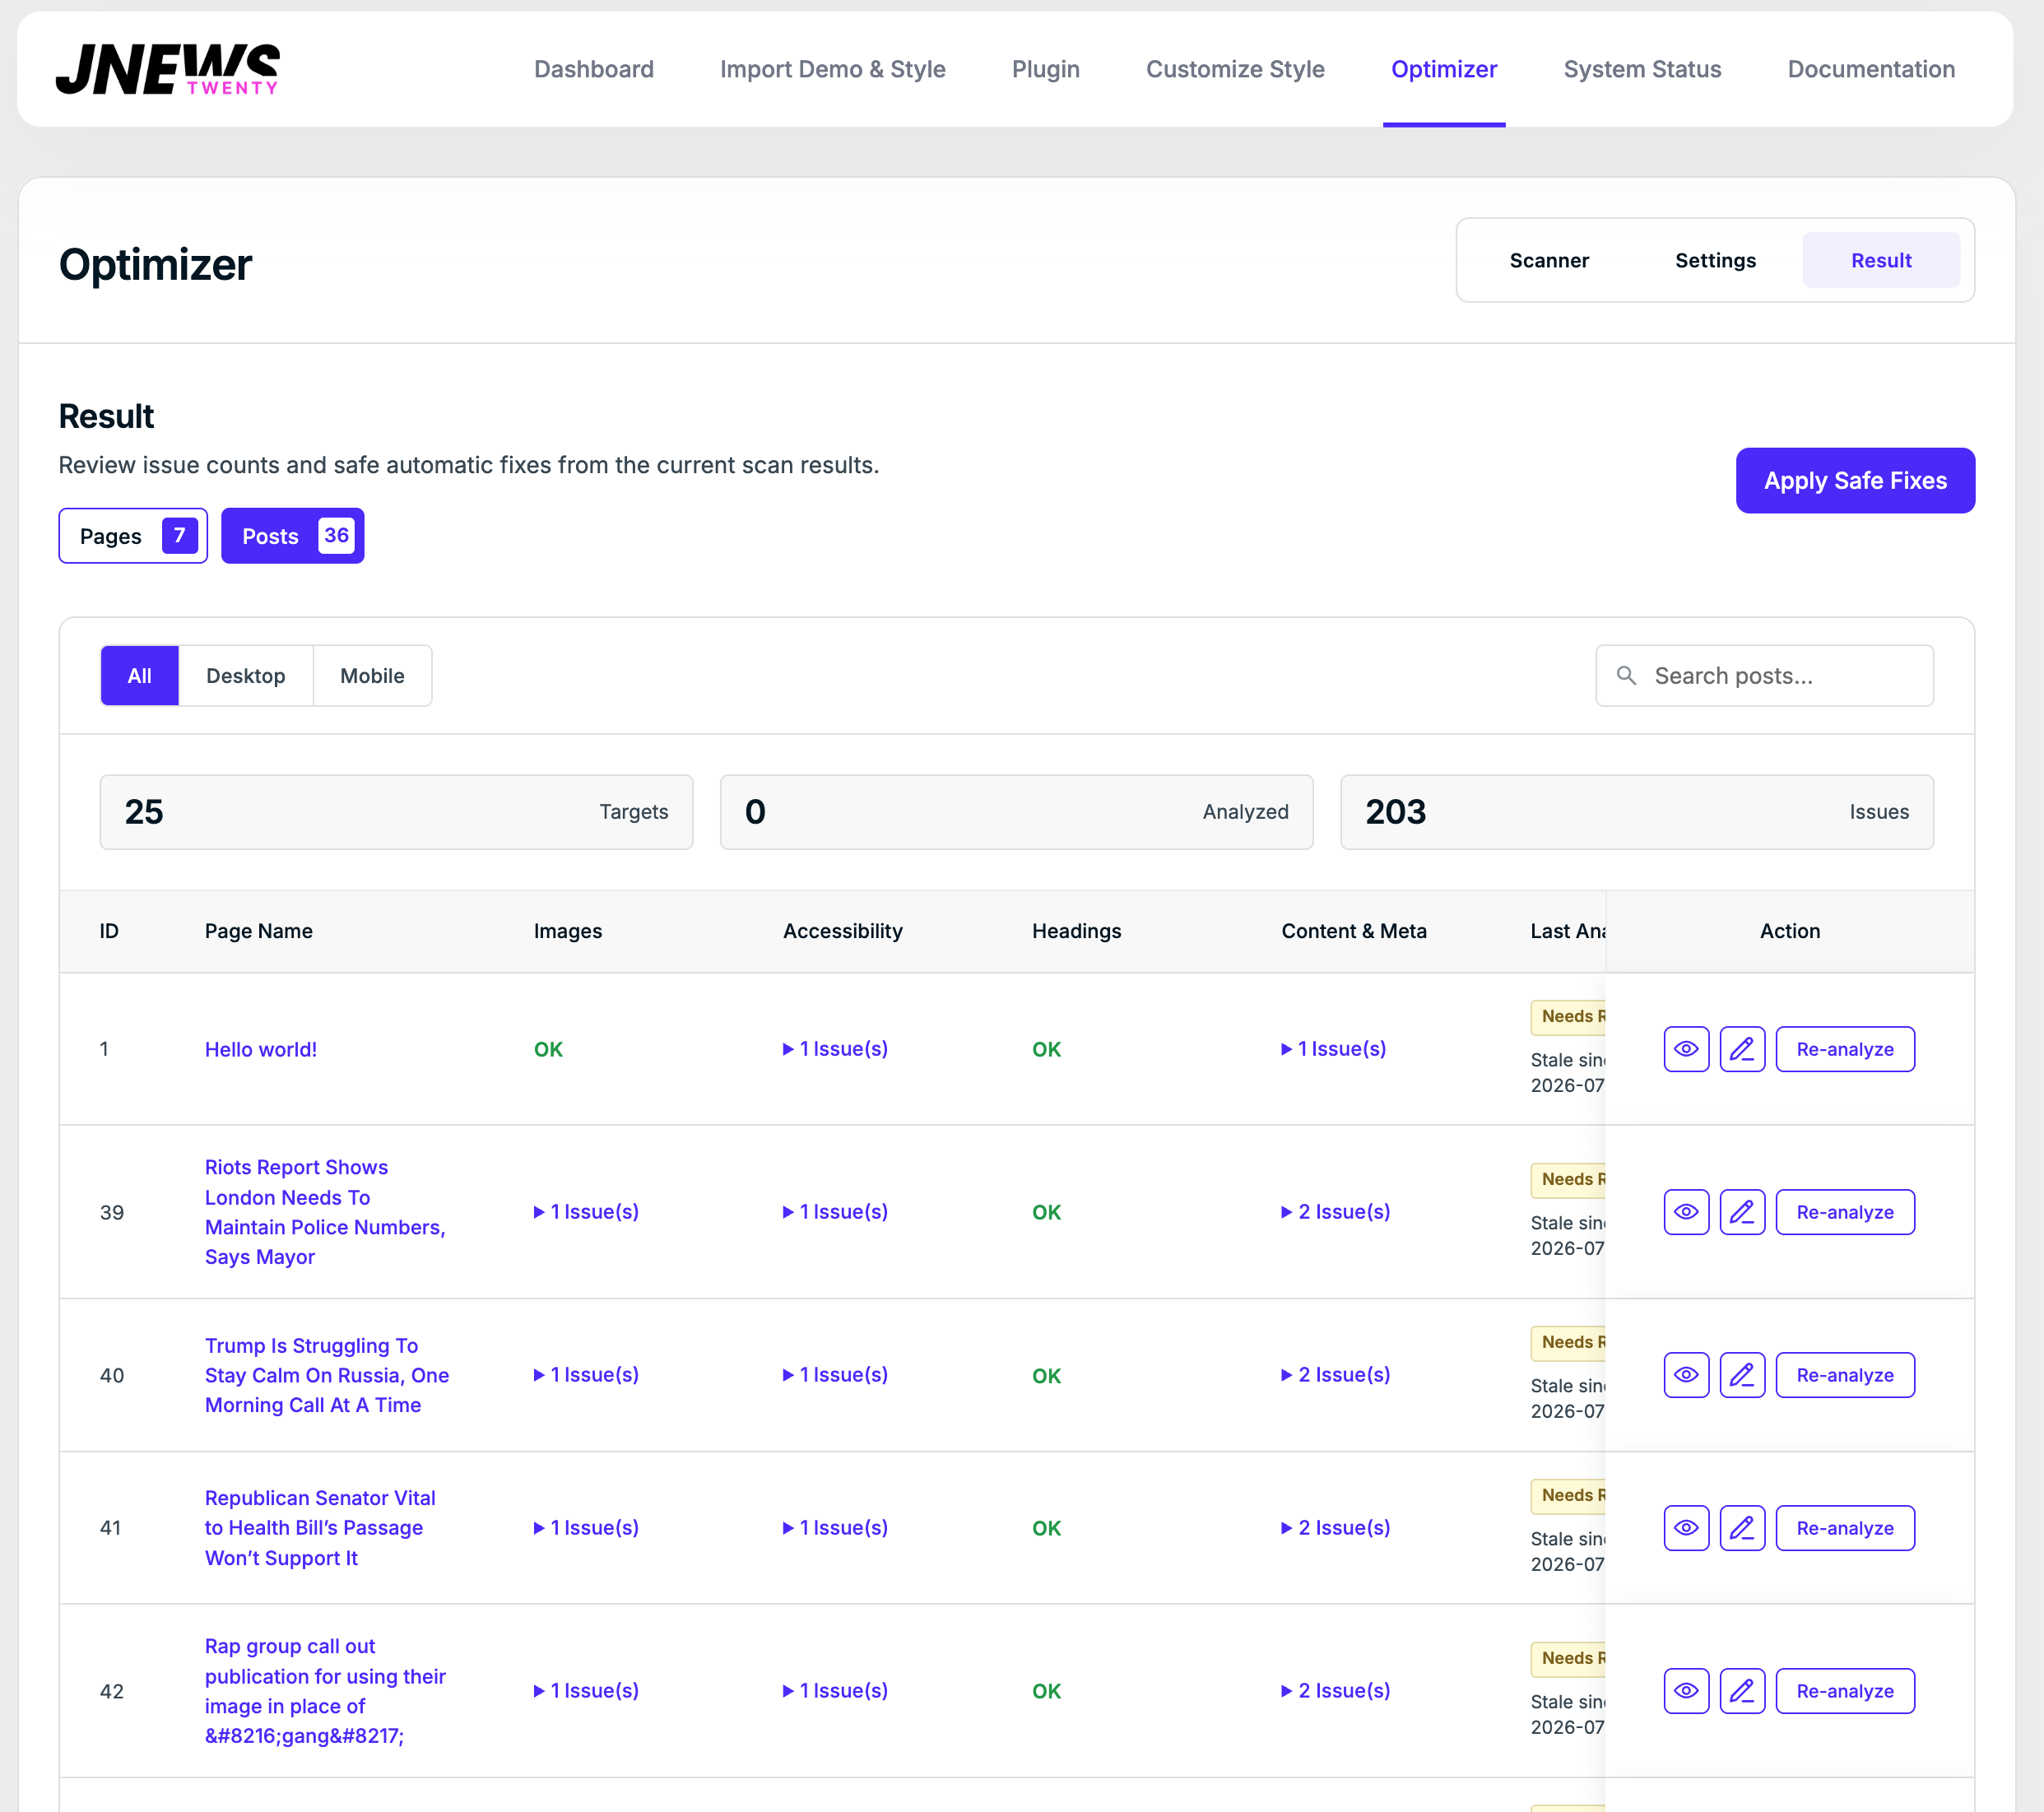
Go to JNews → Optimizer → Result.
Use the Pages and Posts tabs to view each target type separately. Unscanned targets remain visible, so you can see which content still needs to be analyzed.
The Result toolbar provides:
- All — combines matching desktop and mobile issues.
- Desktop — shows issues found in the desktop scan.
- Mobile — shows issues found in the mobile scan.
- Search pages… or Search posts… — filters the active target type.
- Target, analyzed, and issue totals — summarizes the currently loaded result rows.
- Rows — changes the page size to 10, 25, 50, or 100 rows.
The table contains these columns:
| Column | Description |
|---|---|
| ID | The WordPress page or post ID. |
| Page Name | The page or post title. Click the title to open the public URL in a new tab. |
| Images | Missing image dimensions, missing alternative text, and JPEG/PNG WebP opportunities. |
| Accessibility | Accessibility findings such as a missing main landmark. |
| Headings | Missing or multiple H1 headings and skipped heading levels. |
| Content & Meta | Document title and meta description findings. |
| Last Analyzed | Shows whether the stored scan is current, missing, failed, or needs to be refreshed. |
| Action | Opens the public page, opens the detected editable source when available, or re-analyzes the target. |
Click an issue count to expand its details. Depending on the issue, the details can include:
- The issue type and message.
- The affected image or element.
- The CSS selector or attachment ID.
- The desktop or mobile viewport where the issue was detected.
- The detected source and confidence level.
- A Convert image button for an eligible WebP issue.
Result Statuses
- Not scanned
No saved scan result exists for the target. - OK
The saved result is completed and current. This status means the scan data is fresh; it does not necessarily mean that the page has no issues. - Needs re-scan
The page, settings, environment, or an applied fix changed after the saved scan. Re-analyze the target before relying on its issue counts. - Failed
The target could not be scanned. Check the public URL and run Re-analyze again.
Result Actions
- View icon
Opens the public page or post. - Edit icon
Opens the detected editable source when JNews Optimizer has a source edit URL. - Re-analyze
Runs a new scan for that individual target. - Apply Safe Fixes
Starts the supported safe fixes available from the current result data. - Convert image
Generates a WebP derivative for one eligible image issue.
Fixing Manual Review Issues
Manual findings require you to review the page, post, template, or plugin that owns the output.
- Missing or Long Title
Edit the page title or the SEO title in your installed SEO plugin, then re-analyze the page. - Missing Meta Description
Add a suitable meta description through your SEO plugin or page settings. - Missing or Multiple H1
Make sure the page has one meaningful primary H1 heading. - Skipped Heading Level
Reorder the heading structure without choosing heading levels only for visual size. - Missing Image Alternative Text
Add meaningful alternative text for informative images. Leave the alternative text empty only when an image is purely decorative. - Missing Image Dimensions
Set the width and height through the content editor, page builder, image settings, or the template that renders the image. - Missing Main Landmark
Update the page or theme template so the primary content is contained in amainelement or an element withrole="main".
After making a manual change:
- Save or update the page, post, template, or plugin setting.
- Clear page, server, and CDN caches.
- Return to JNews → Optimizer → Result.
- Click Re-analyze for the affected target.
- Expand the relevant issue column and confirm the issue is no longer listed.
Recommended Optimization Workflow
For the safest and easiest-to-review result:
- Deactivate Autoptimize if it is active, and keep it deactivated while JNews Optimizer is enabled.
- Install and activate JNews Optimizer.
- Confirm that the JNews license is active and open JNews → Optimizer.
- Open Settings, apply the recommendations, review them, and click Save Settings.
- Clear all caches and test important frontend features while signed out.
- Open Scanner and scan a small group of important pages first.
- Review Quick Wins, Recommended Options, and Manual Review separately.
- Apply the selected safe WebP fixes.
- Clear caches and re-analyze every row marked Needs re-scan.
- Fix SEO, heading, image text, dimensions, and accessibility findings manually.
- When the workflow is verified, scan the remaining eligible pages and posts.
Troubleshooting
- The Optimizer dashboard remains locked
Confirm that the JNews license is active, has not expired, and is registered for the current website domain. Refresh the WordPress dashboard after correcting the license. - No scan targets are available
Confirm that the content is a published standard WordPress page or post. JNews Builder, virtual archive, WooCommerce archive/product, and product targets are excluded. - A scan fails
Open the public URL and make sure it is reachable on the same domain. Check whether maintenance mode, password protection, a security rule, or another access restriction blocks the page. - WebP conversion is skipped
Confirm that the image is a local JPEG or PNG, the file exists in WordPress uploads, the current account can upload/edit media, and the server image editor supports WebP. - The row says Needs re-scan after a successful fix
This is expected. Clear caches and click Re-analyze to verify the new rendered output. - Recommended settings do not remain enabled
Click Save Settings after clicking Apply Recommendations. - A frontend feature stops working after optimization
Disable the most relevant recently enabled setting, save the settings, clear all caches, and test again. For a JavaScript issue, review Lazy Load JS handles and excluded paths first.