
Our theme provides a wide range of customization options to help you tailor its functionality and appearance to your website’s needs. These settings allow you to adjust various aspects of the theme’s blocks and components, giving you greater control over how they behave and integrate with your website’s design.
These options help you organize your content more effectively and provide a better browsing experience for your website visitors. These filtering options are available in JNews Blocks – Module, JNews Blocks – Hero, JNews Blocks – Slider, JNews Blocks – Carousel, and other blocks that provide similar functionality.
There’re a few things that we’ll explain to you on this section :
1. Header
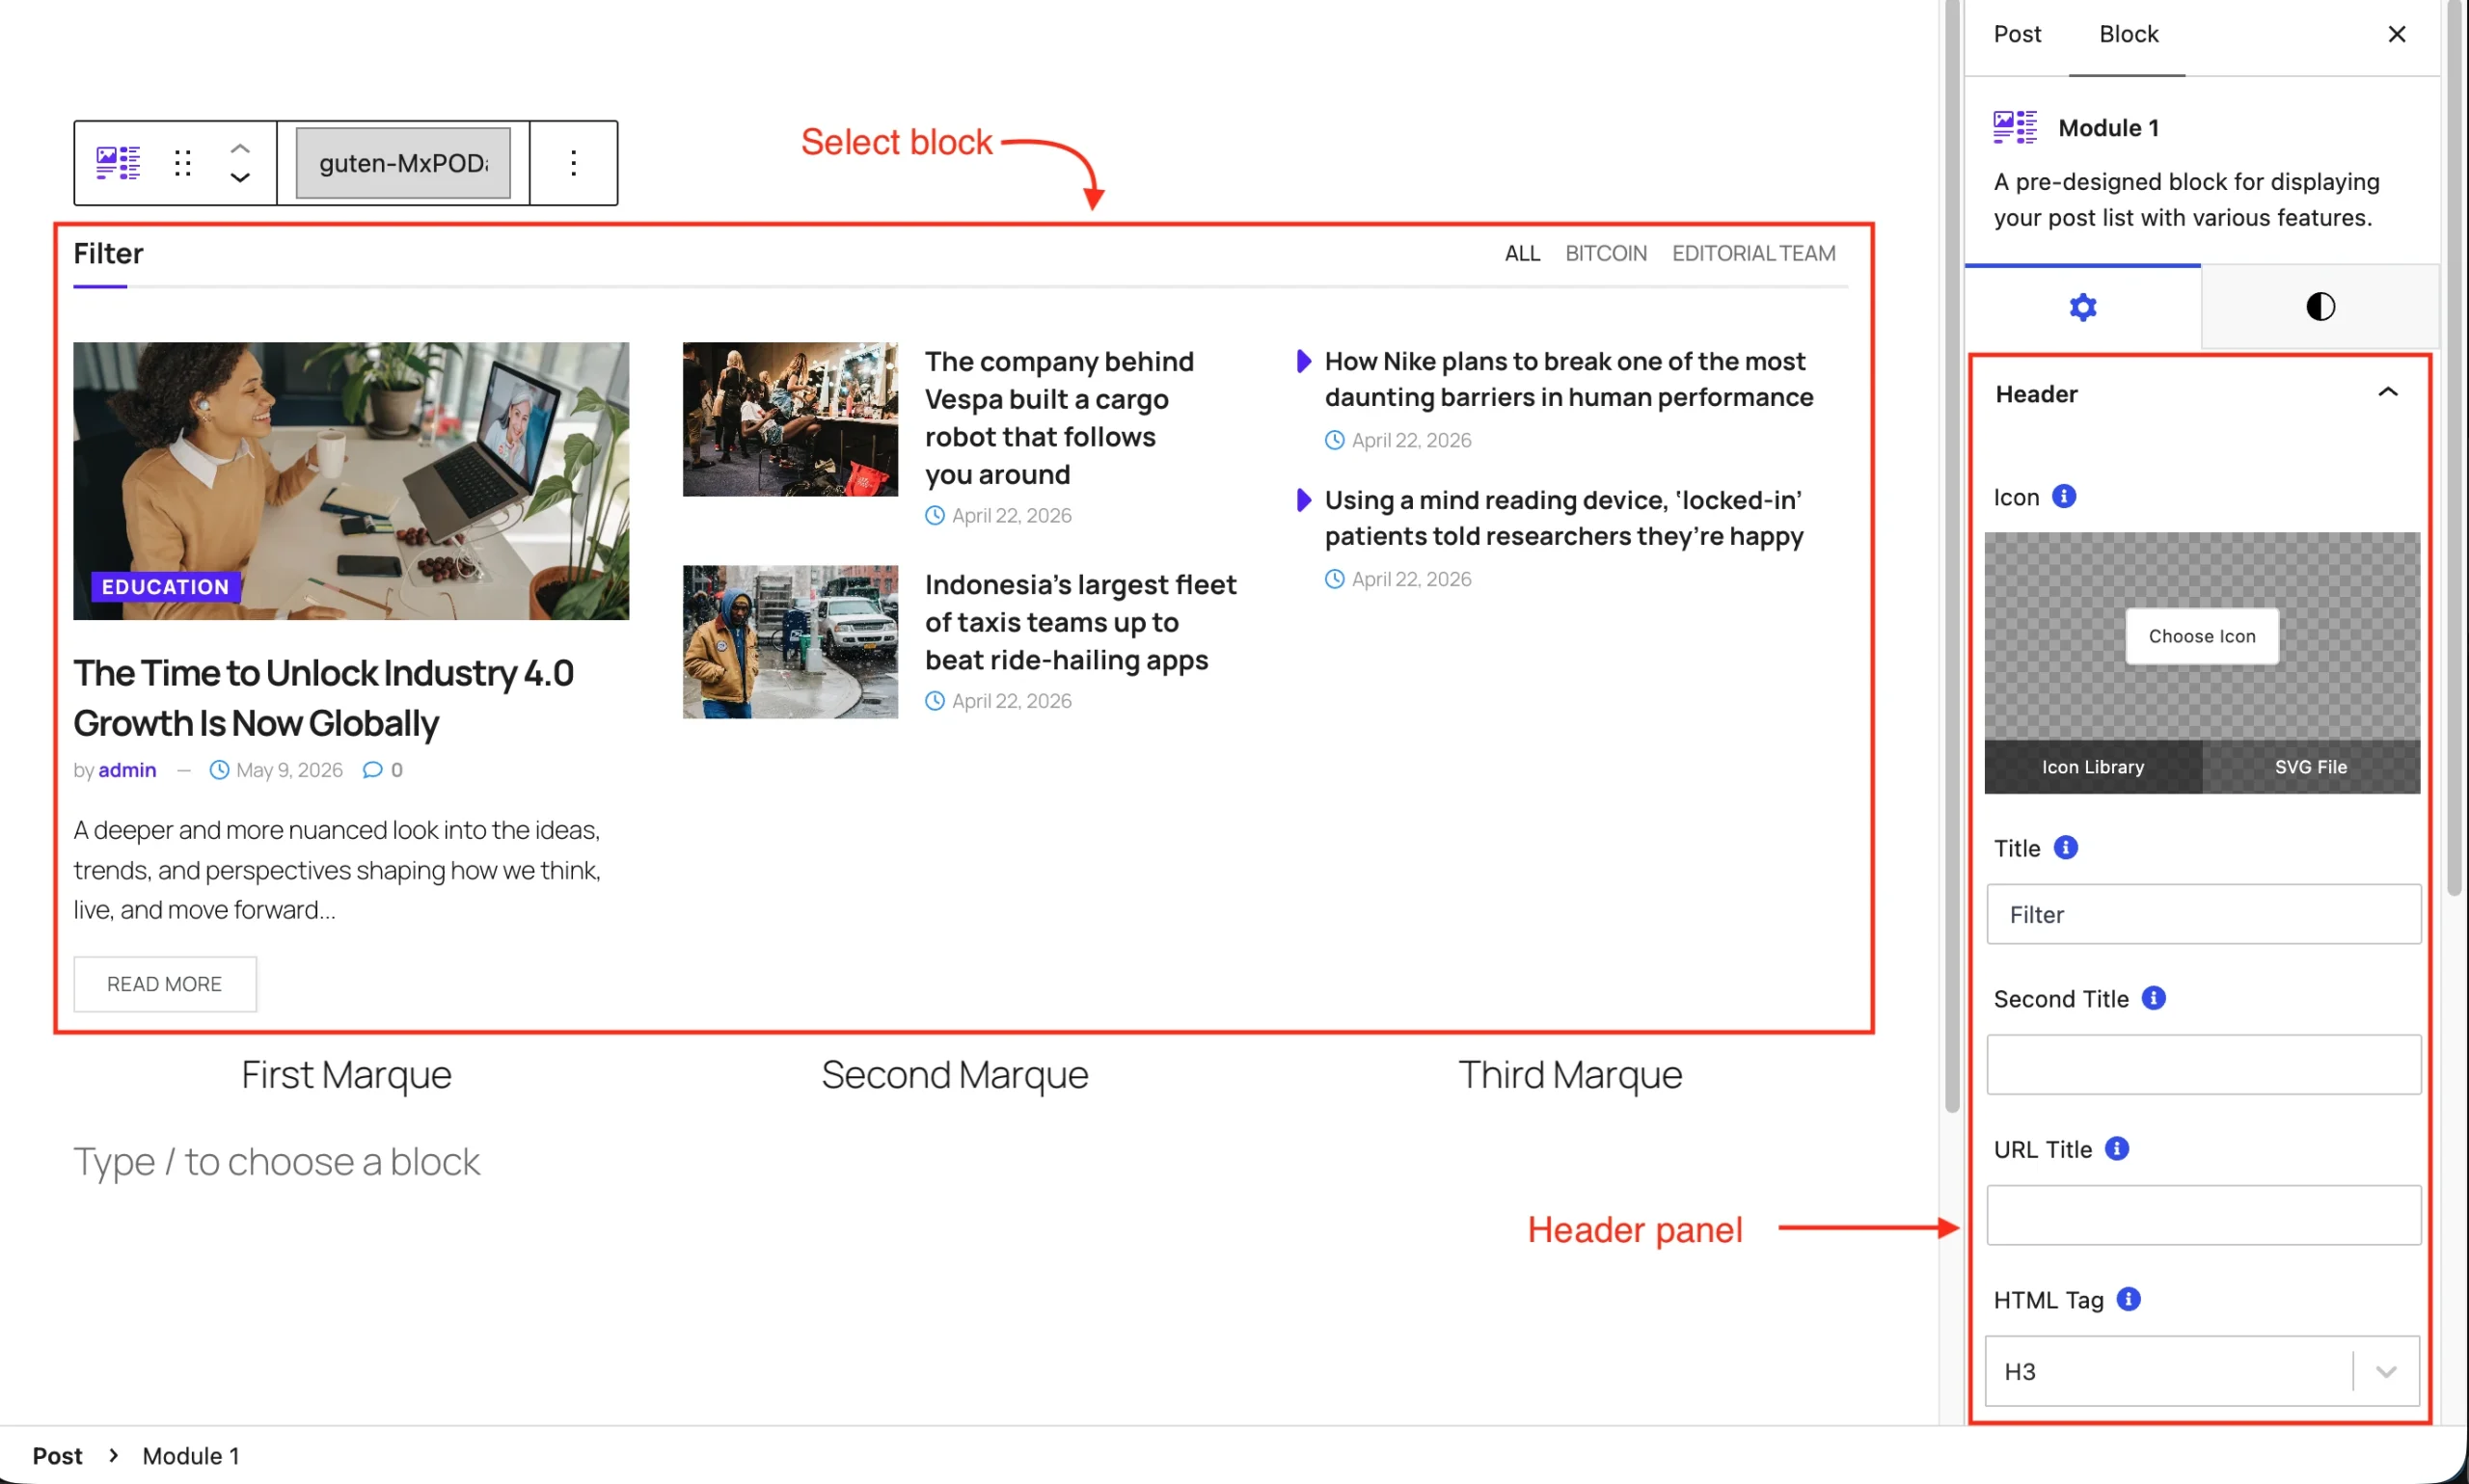
The following explains each available option :
- Icon: Choose an icon for the module header. This option appears when either Title or Second Title has text.
- Title: Enter the module’s main heading.
- Second Title: Enter a secondary heading to accompany the main title.
- URL Title: Enter the destination URL for the heading link.
- HTML Tag: Choose the heading tag for the module header: H1, H2, H3, H4, H5, or H6.
2. Header Filter
The Header Filter feature is used to add a filter button next to the Header Title of the JNews Blocks Element, which users can use to filter the content displayed in that JNews Blocks Element. You can add filters based on Category, Tags, or Author.

The following explains each available option :
- Category : You can add the list of categories you want to include in the header filter using this option.
- Author : You can add the list of authors you want to include in the header filter using this option.
- Tags : You can add the list of tags you want to include in the header filter using this option.
- Default Text : You can change the Default Text option value to change the displayed text in the first item text on the heading filter.

3. Content Filter
The Content Filter feature is used to filter the content displayed on JNews Blocks elements based on the Content Filter options set by the Editor on the respective element.

The following explains each available option :
- Include Post Type : You can choose between the Post and Page post types.
- Content Type : Filtering the content displayed based on the content type of your posts, you can choose which content type can be displayed on that Element. Here is the explanation of each available option:
- All: Displays all types of post content.
- Only Review: Displays only posts with Post Review enabled.
- Only Post: Displays all post formats except those with Post Review enabled.
- Only Video: Displays only video format posts.
- Only Gallery: Displays only gallery format posts.
- Only Standard Post: Displays only standard format posts, excluding those with Post Review enabled.
- Number of Post initially showed : Set the initial number of items displayed, from 1–10. This field is absent from the Hero Content Filter panel.
- Post Offset : Skip a specified number of items before displaying results.
- Include into Unique Content Group : Prevent duplicate content across modules in the same group. Choices: Disable, Group 1, and Groups 2–5 (Pro). AJAX-loaded content does not affect this feature.
- Include Post : Select specific posts or pages to include by searching their titles or entering IDs.
- Include Only : Display only the items selected in Include Post.
- Exclude Post : Select posts or pages to omit by title or ID.
- Include Category : Include content from selected categories.
- Exclude Category : Omit content from selected categories.
- Include Author: Include content written by selected authors.
- Include Tag: Include content with selected tags.
- Exclude Tag: Omit content with selected tags.
- Sort By: Choose how results are ordered; choices are listed below. Here is the explanation of each available option:
- Latest: Newest posts first.
- Oldest: Oldest posts first.
- Alphabet Asc: Titles ordered A–Z.
- Alphabet Desc: Titles ordered Z–A.
- Random: Display posts in random order.
- Random Week: Random posts published within the past week.
- Random Month: Random posts published within the past month.
- Most Comment: Posts with the most comments first.
- Most Comment (1 Day) (Pro): Most-commented posts for the one-day period.
- Most Comment (7 Days) (Pro): Most-commented posts for the seven-day period.
- Most Comment (30 Days) (Pro): Most-commented posts for the thirty-day period.
- Popular Post (1 Day) (Pro): Popular posts for the one-day period.
- Popular Post (7 Days) (Pro): Popular posts for the seven-day period.
- Popular Post (30 Days) (Pro): Popular posts for the thirty-day period.
- Popular Post (All Time) (Pro): Popular posts across all time.
- Highest Rate – Review (Pro): Highest-rated reviews first.
- Most Like (Thumb up) (Pro): Posts with the most likes first.
- Most Share (Pro): Posts with the most shares first.
4. Content Setting
The Content Setting panel controls which posts or pages appear in a module and how they are ordered. Use it to set the initial item count, include or exclude content by post, category, author, or tag, and prevent duplicate content across modules with unique content groups. Available options vary by module and Pro features.
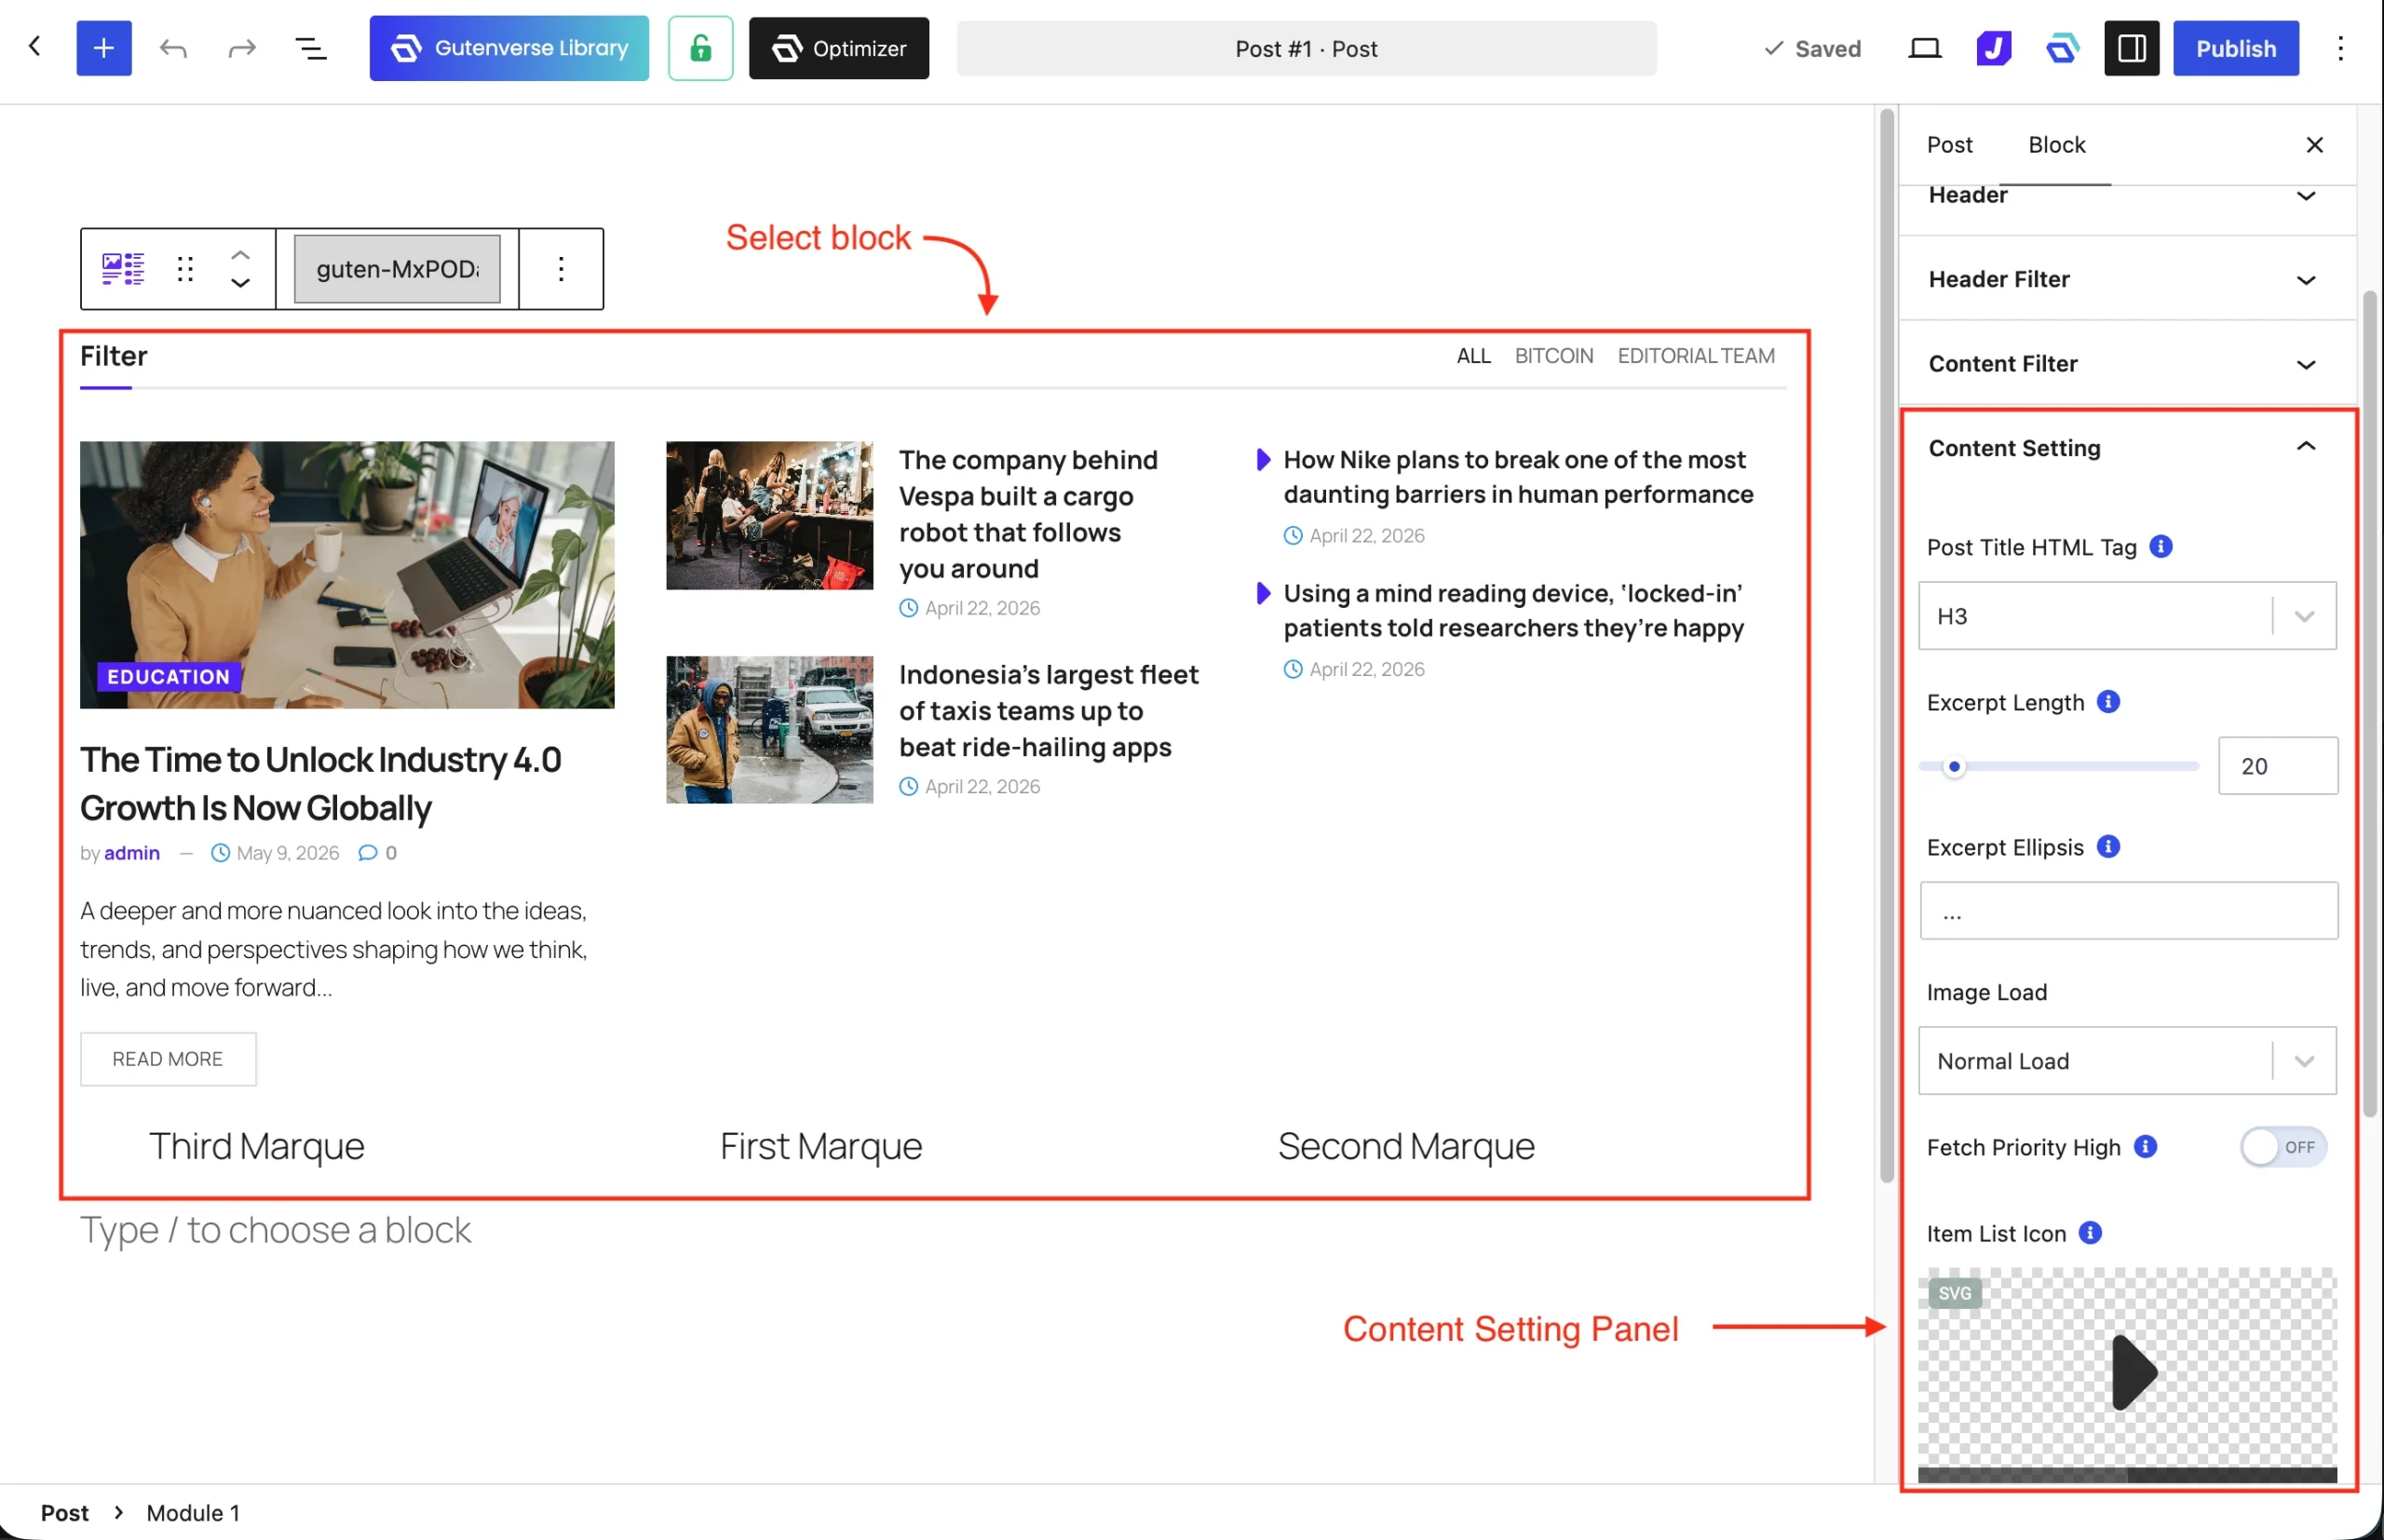
The following explains each available option :
- Post Title HTML Tag: Choose the HTML heading tag for post titles: H1, H2, H3, H4, H5, or H6.
- Excerpt Length: Set the excerpt length from 1–200 words. This option appears when excerpts are enabled.
- Excerpt Ellipsis: Set the text or characters appended to the excerpt, such as “…”. This option appears when excerpts are enabled.
- Image Load: Choose Normal Load to load images eagerly, or Lazy Load to defer image loading until needed.
- Fetch Priority High: Signal the browser to prioritize fetching the image. Use this for the LCP (Largest Contentful Paint) image. This option appears when normal/eager loading is selected or resolved as the default.
5. Meta Setting
The Meta Setting panel controls the post details displayed in a module, such as the author, date, and comments. Use it to show or hide metadata and choose how dates are formatted. Available options depend on the module.
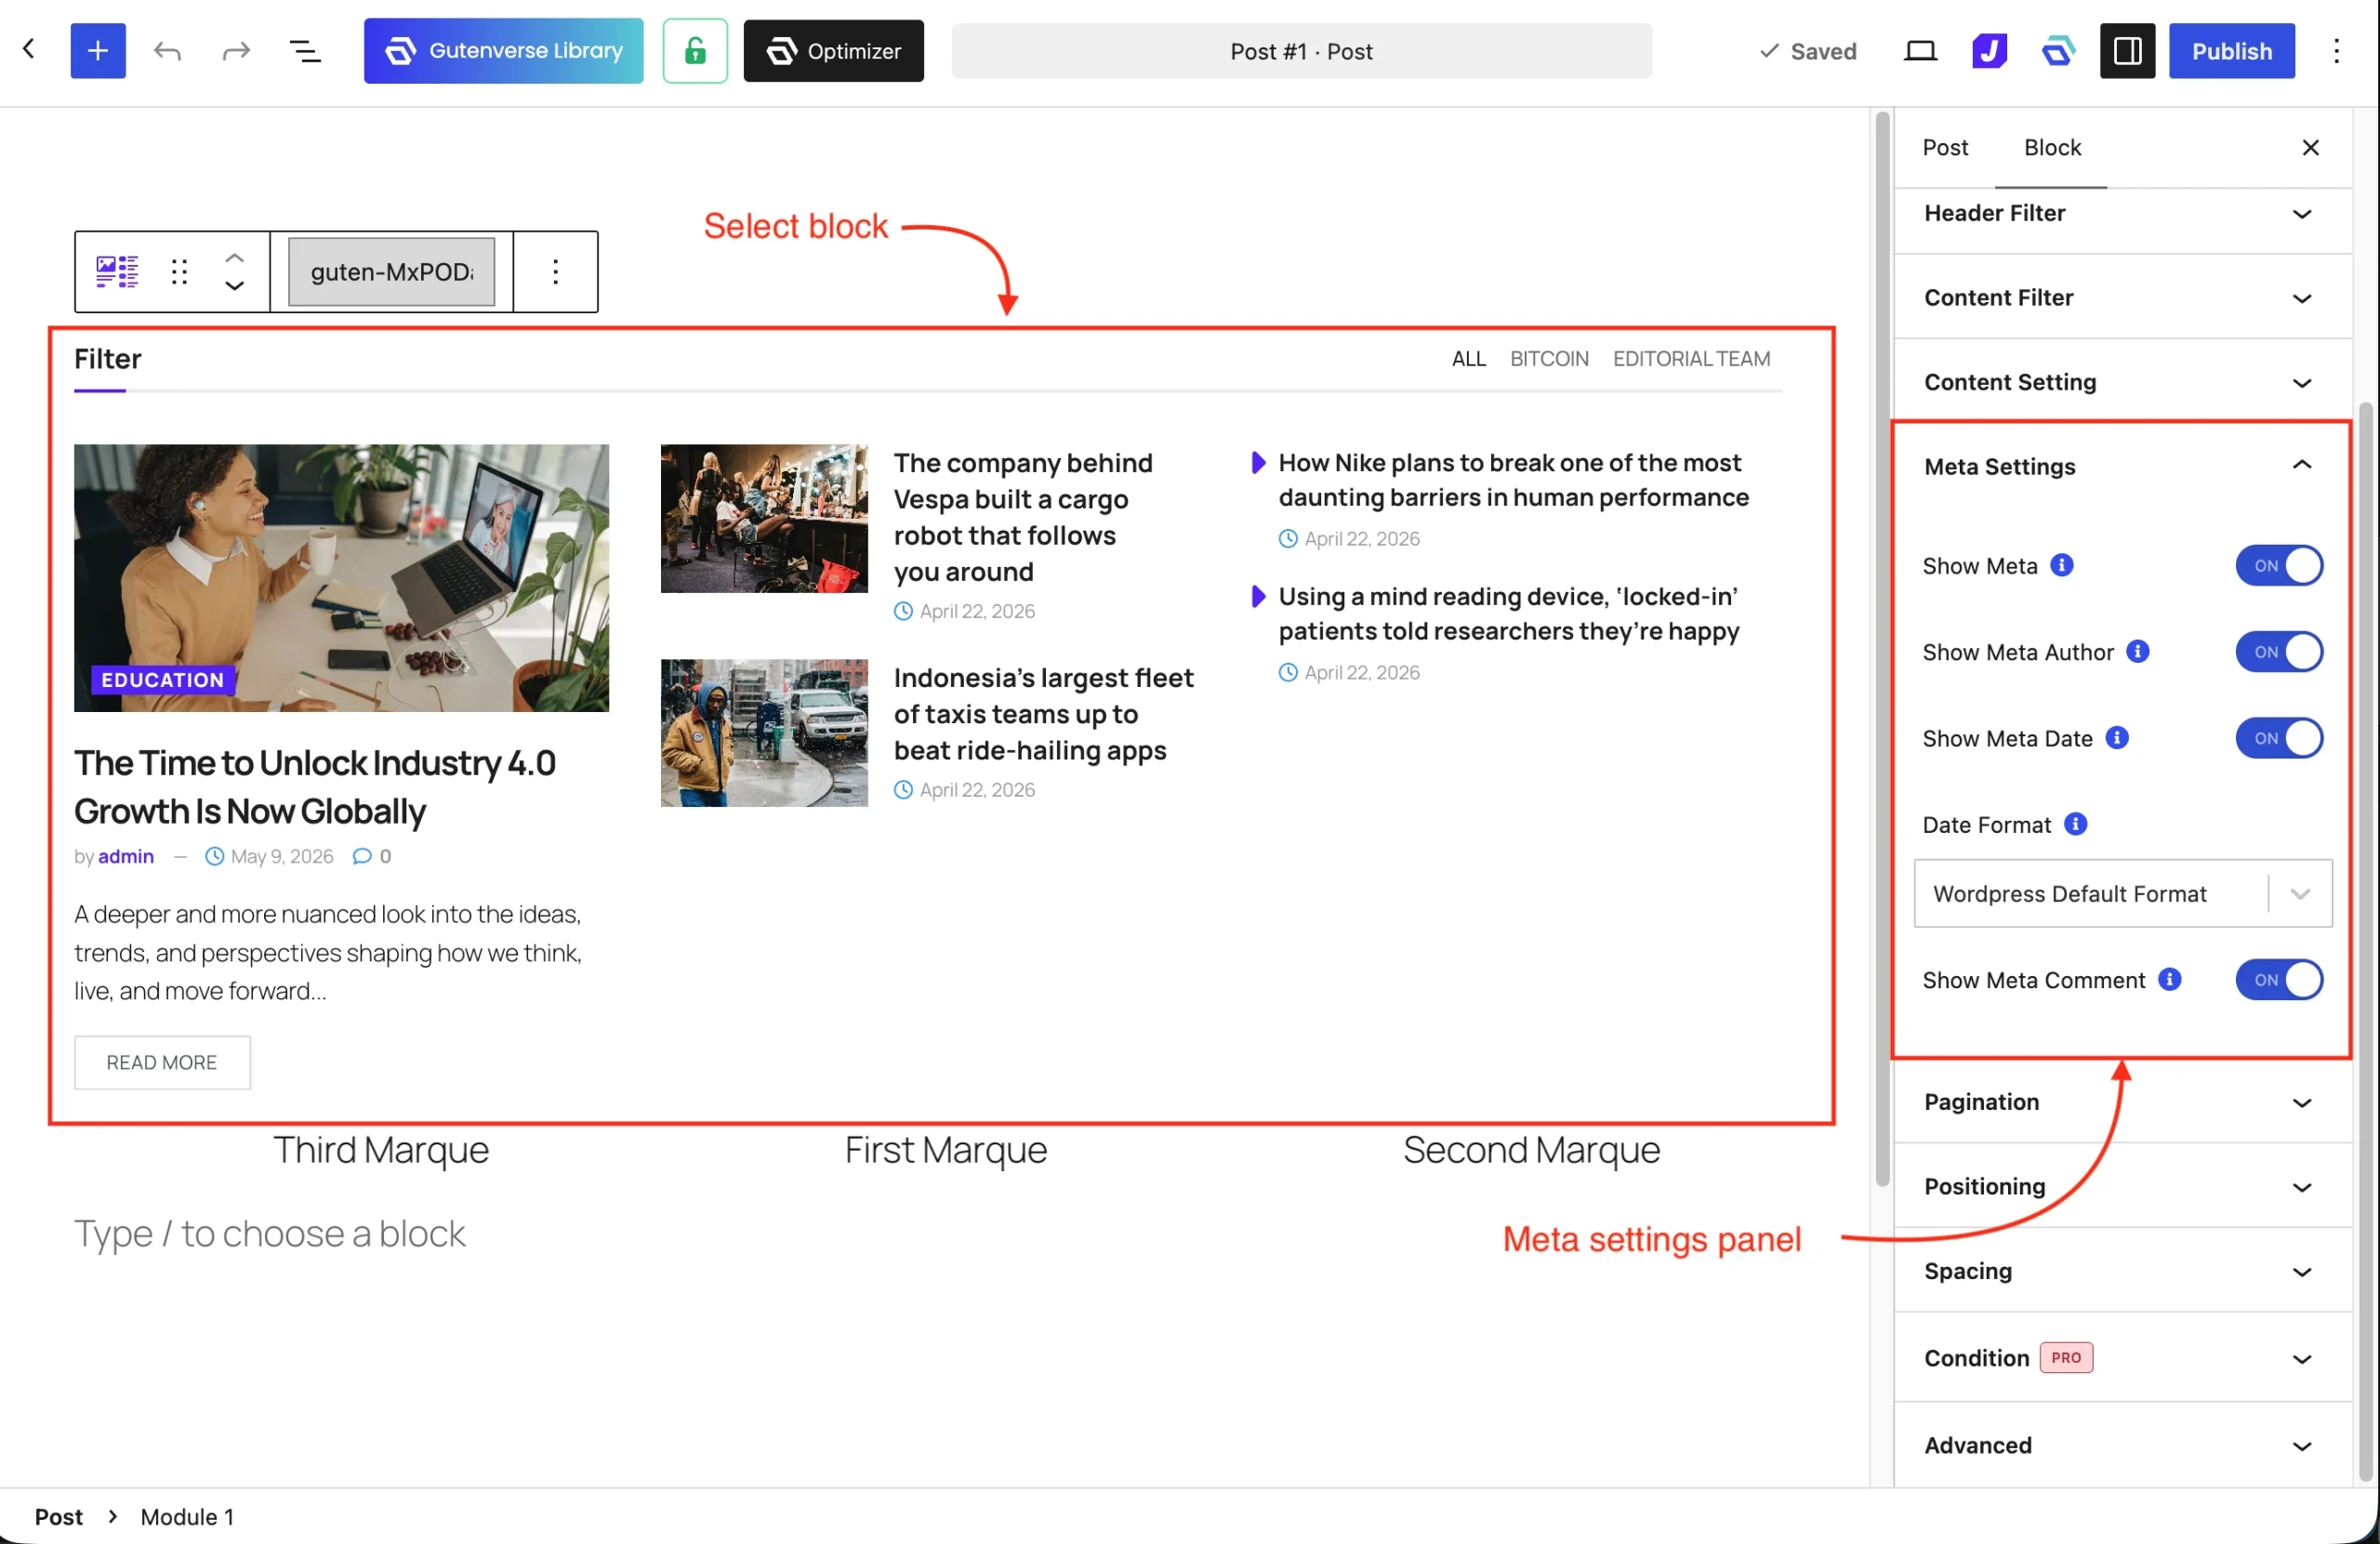
The following explains each available option :
-
- Show Meta: Show or hide the module’s post metadata. Enable this to access the individual author, date, and comment toggles.
- Show Meta Author: Show or hide the post author. Available in modules that support author metadata when Show Meta is enabled.
- Show Meta Date: Show or hide the post date. Available in modules that support date metadata when Show Meta is enabled.
- Date Format: Choose how the post date is displayed. Available when Show Meta and Show Meta Date are enabled. The following explains each available option :
- Relative Date/Time Format (ago): Display elapsed time, such as “2 hours ago”.
- WordPress Default Format: Use the default WordPress date format.
- Custom Format: Use a date format you specify.
- Custom Format: Enter the custom date format. Available in modules that support date metadata when Show Meta is enabled and Date Format is set to Custom Format.
- Show Meta Comment: Show or hide comment metadata. Available in modules that support comment metadata when Show Meta is enabled.