Jeg Weather General Setting
Right after you’ve done with the plugin activation, next you can setup general plugin settings to fit with your website’s need. You can access general Jeg Weather setting by simply go to WP Dashboard → Apperance → Customize → Jeg: Weather
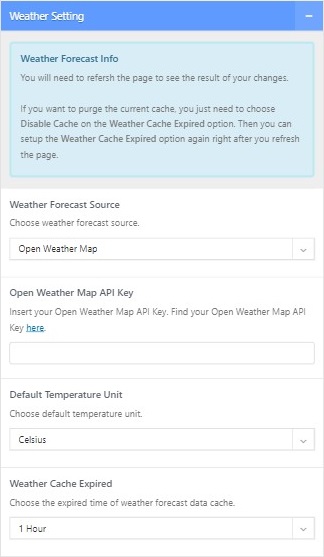
You will need to refresh the page to see the result of your changes.
If you want to purge the current cache, you just need to choose Disable Cache on the Weather Cache Expired option. Then you can set up the Weather Cache Expired option again right after you refresh the page.
- Weather Setting

- Weather Forecast Source
Choose the weather forecast source. Required for obtaining necessary data to be displayed on Jeg: Weather widget.- Yahoo Weather
Get the weather forecast from Yahoo Weather. Obtain the App ID, Consumer key & secret here. - Dark Sky
Get the weather forecast from Dark Sky. Obtain the secret key here. - Open Weather
Get the weather forecast from Open Weather. Obtain the API key here. - Aeris Weather
Get the weather forecast from Aeris Weather. Obtain the client ID & secret here.
- Yahoo Weather
- Default Temperature Unit
Set your weather default temperature unit. - Weather Cache Expired
Choose the expired time of weather forecast data cache. Caching can prevent an overused API call. Choose disable to purge the weather cache.
- Weather Forecast Source
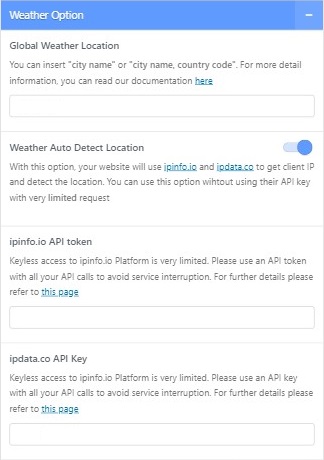
- Weather Option

- Global Weather Location
Input your weather forecast location. You can insert “city name” or “city name, country code”. - Weather Auto Detect Location
With this option, your website will use ipinfo.io and ipdata.co to get client IP and detect the location. You can use this option without using their API key but with a very limited request.
- Global Weather Location
Jeg Weather Element Setting
After setting up basic weather settings, now you can set up weather elements. Choose your desired editor ( Elementor or WP Bakery ) to use the Jeg Weather element.
The available Jeg Weather elements are:
- JEG Weather – Main

Recommended placement at the top of the page content. - JEG Weather – Inline

Designed to be placed inside text blocks. - JEG Weather – Mini


Interactive weather element & designed to be placed at the header.
To set up the elements, these are settings that are needed to be configured.
- General
- Date Format
Please set the date format for the weather widget. To get more detail about this format, please refer to Developer Codex. Leave blank to hide the date.
- Detail Weather Forecast
Choose whether to show or hide the weather forecast. If the show is chosen, set the option below to configure the weather forecast.- Next Days Weather Forecast
Set how the weather forecast information is displayed. The option is listed below.- Show All
- Temperature Only
- Icon Weather Only
- Hide All
- Number of Weather Item
Choose the number of days to be forecast. Can be set between 3 to 6 days.
- Next Days Weather Forecast
- Image Background
Set an image background for your weather element.
- Date Format
- Location
- Location Name
Input your displayed weather location. You can insert “city name” or “city name, country code”. Empty it to use the default weather location. - Override Global Location
Enable this option to override global location settings.- Weather Location
Input your weather forecast location. You can insert “city name” or “city name, country code”. - Auto Detect Location
Enable this option to autodetect location. Location set at Weather Location will be rendered useless with this setting enabled.
- Weather Location
- Location Name
Jeg Weather API
- Yahoo Weather
This API has been depreciated. Please refer to this link for additional detail. - Dark Sky
New sign-up is no longer available. To use this API, make sure to also submit Google Map API Key at Customize → JNews : Header Option → Header – Weather Setting. - Open Weather Map
Obtain the API at this link. Make sure to also submit Google Map API Key at Customize → JNews : Header Option → Header – Weather Setting. - Aeris Weather
Obtain the API at this link.
